Introduction
KYPO Cyber Range Platform (KYPO CRP) is an open-sourced cyber range platform developed by Masaryk University since 2013, which enables teachers to create simple or complex cyber security experiments, leveraging the powerful functions of OpenStack, Ansible and Terraform.
To demonstrate its functions, KYPO has open-sourced some demo-trainings. And we have imported, deployed and tried some of them in the local KYPO instance.
Besides the official trainings, we’d like to create our own training and instantiate the new training in the local KYPO, so as to evaluate the extensibility of KYPO. Currently we have designed a training and walked it through in KYPO, writeup for which is available now.
This post summarizes the whole process needed to create a new training in KYPO. The content of this document is divided into three parts:
- Firstly, we will analyze the components and structure of one existing training in KYPO’s repository. After analyzing this we would have enough knowledge to create new trainings.
- Secondly, we will design and implement our own training, which is a simple penetration test consisting of two victim machines and four distinct hacking techniques.
- Finally, we will share our experiences with KYPO and some comments in summary.
Note that KYPO’s document website offers lots of helpful resources:
- https://docs.crp.kypo.muni.cz/user-guide-advanced/trainings/trainings-overview/
- https://docs.crp.kypo.muni.cz/user-guide-advanced/sandboxes/sandboxes-overview/
- https://docs.crp.kypo.muni.cz/user-guide-advanced/sandboxes/sandbox-definition/
- https://docs.crp.kypo.muni.cz/user-guide-advanced/sandboxes/topology-definition/
- https://docs.crp.kypo.muni.cz/user-guide-advanced/sandboxes/topology-instance/
- https://docs.crp.kypo.muni.cz/user-guide-advanced/sandboxes/sandbox-provisioning/
- https://docs.crp.kypo.muni.cz/user-guide-advanced/sandboxes/sandbox-access/
- https://docs.crp.kypo.muni.cz/user-guide-advanced/sandboxes/sandbox_dockers/
Analyze One Existing Training Example
Briefly speaking, one typical training in KYPO is made up of three different parts:
- Training definition. This part specifies all the levels one training has, and attributes for each level, e.g., title, description, answer, solution, hint and so on.
- Sandbox definition. This part specifies sandbox topology and provisioning of sandbox nodes (virtual machines).
- Topology definition. This part is used to describe the topology of the training environment. That is, how many nodes there are, from which images these nodes are created and how these nodes are interconnected.
- Sandbox provisioning. This part is to customize the whole training environment. An environment of nodes built from standard images with a specific network topology is far from the expected cyber range. Each sandbox needs to be provisioned to be ready for the training.
- Virtual machine images. To spawn virtual machines needed in the sandbox definition, all the related images must be available in the underlying OpenStack.
In this section, we will analyze the junior hacker training in KYPO’s official repository.
Training Definition
The training definition is a JSON file for each training. The one for junior hacker training could be found here.
Here is the structure of this file:
{
  "title" : "Junior Hacker Training",
  "description" : "Introductory training",
  "prerequisites" : [ ],
  "outcomes" : [ "You will learn how to scan a server, how to find out possible vulnerabilities and how to exploit them." ],
  "state" : "UNRELEASED",
  "show_stepper_bar" : true,
  "levels" : [ ... ],
  "estimated_duration" : 33,
  "variant_sandboxes" : false
}
The ... in the structure above consists of one or more levels’ description. For example, the password cracking level looks like:
{
    "title" : "Crack the password to the zip",
    "level_type" : "TRAINING_LEVEL",
    "order" : 5,
    "estimated_duration" : 10,
    "answer" : "IhateMyJob",
    "answer_variable_name" : null,
    "content" : "...The flag is the password to the ZIP.",
    "solution" : "...",
    "solution_penalized" : true,
    "hints" : [ {
      "title" : "Where is the wordlist stored?",
      "content" : "Wordlists are stored in /usr/share/wordlists...",
      "hint_penalty" : 6,
      "order" : 1
    }, {
      "title" : "How to use the Fcrackzip tool?",
      "content" : "You can perform a dictionary attack by using `-D` option of the `fcrackzip` command...",
      "hint_penalty" : 4,
      "order" : 0
    } ],
    "incorrect_answer_limit" : 10,
    "attachments" : [ ],
    "max_score" : 20,
    "reference_solution" : [ {
      "state_name" : "use_fcrackzip",
      "prereq_state" : [ "scp_zip" ],
      "cmd" : "fcrackzip -D -u -p /usr/share/wordlists/fasttrack.txt invoices2019.zip",
      "cmd_type" : "bash-command",
      "cmd_regex" : "fcrackzip -D -u -p .*fasttrack.txt .*invoices2019.zip",
      "optional" : false
    } ]
  },
Actually, there is no need for us to write the training definition manually. KYPO dashboard provides an interactive way to create training. We can design the training playbook in KYPO dashboard and export it to a JSON file, just like the one shown above. More details of training definition can be found here.
Sandbox Definition
One sandbox definition is mainly made up of two components: topology definition and sandbox provisioning. Note that there are two extra coponents, the Vagrantfile and the preconfig directory, in the junior hacker training’s repository. They are only used when you want to create a local sandbox which could be run with Vagrant, instead of KYPO. This post does not cover the creation of local sandbox. If you want to learn about how to create a local sandbox, please refer to the resources listed in the Introduction part.
Topology Definition
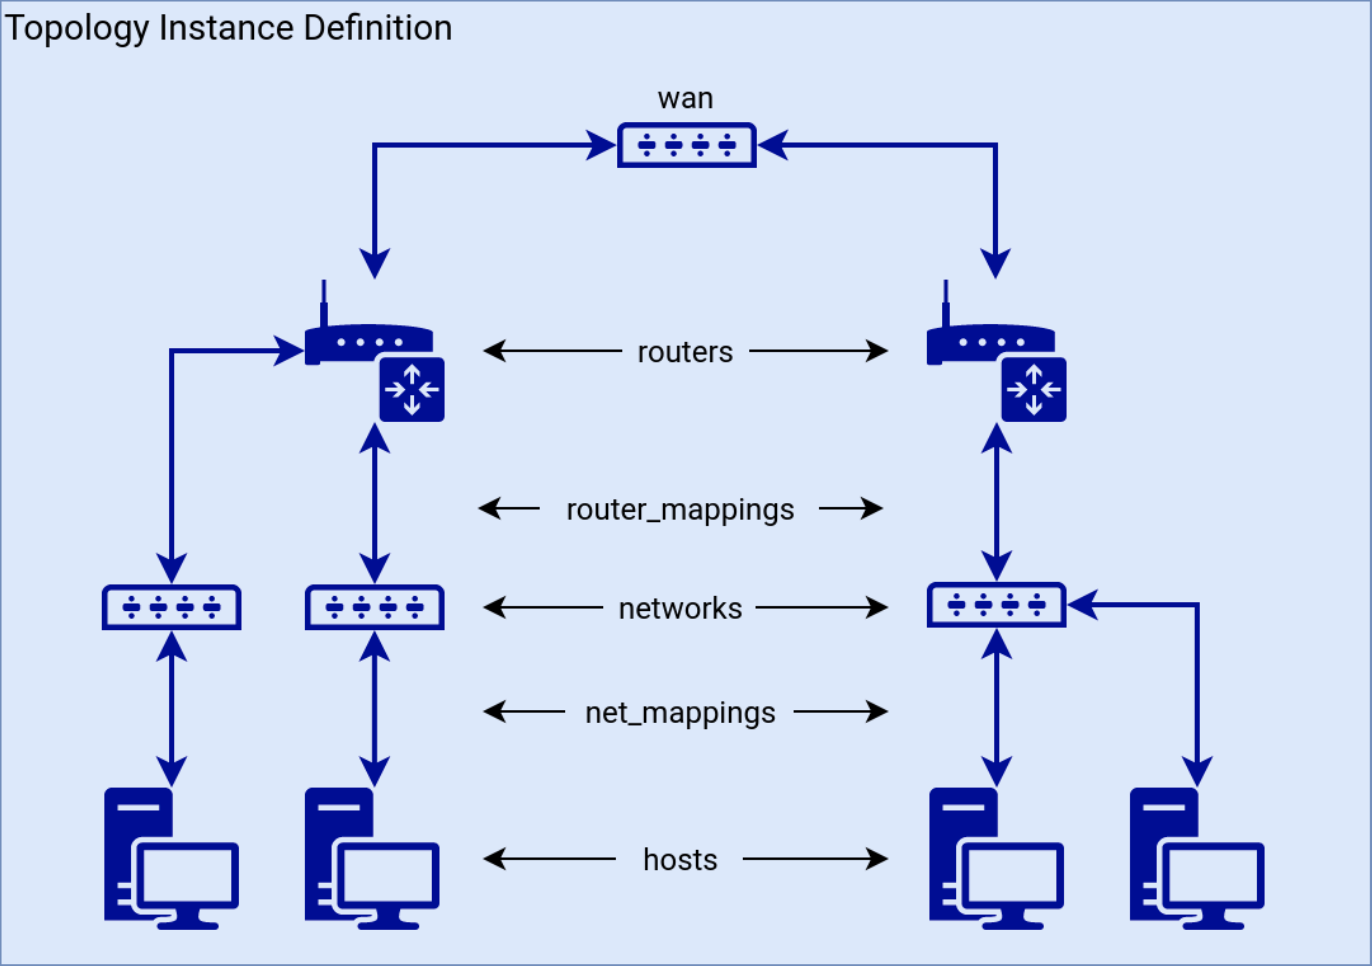
The definition of topology is written in a YAML file. We can define hosts, routes, networks and wan in this file, then use net_mappings and router_mappings to define their interconnection relationship. The topology architecture sample helps to visualize what we can define in the topology definition:
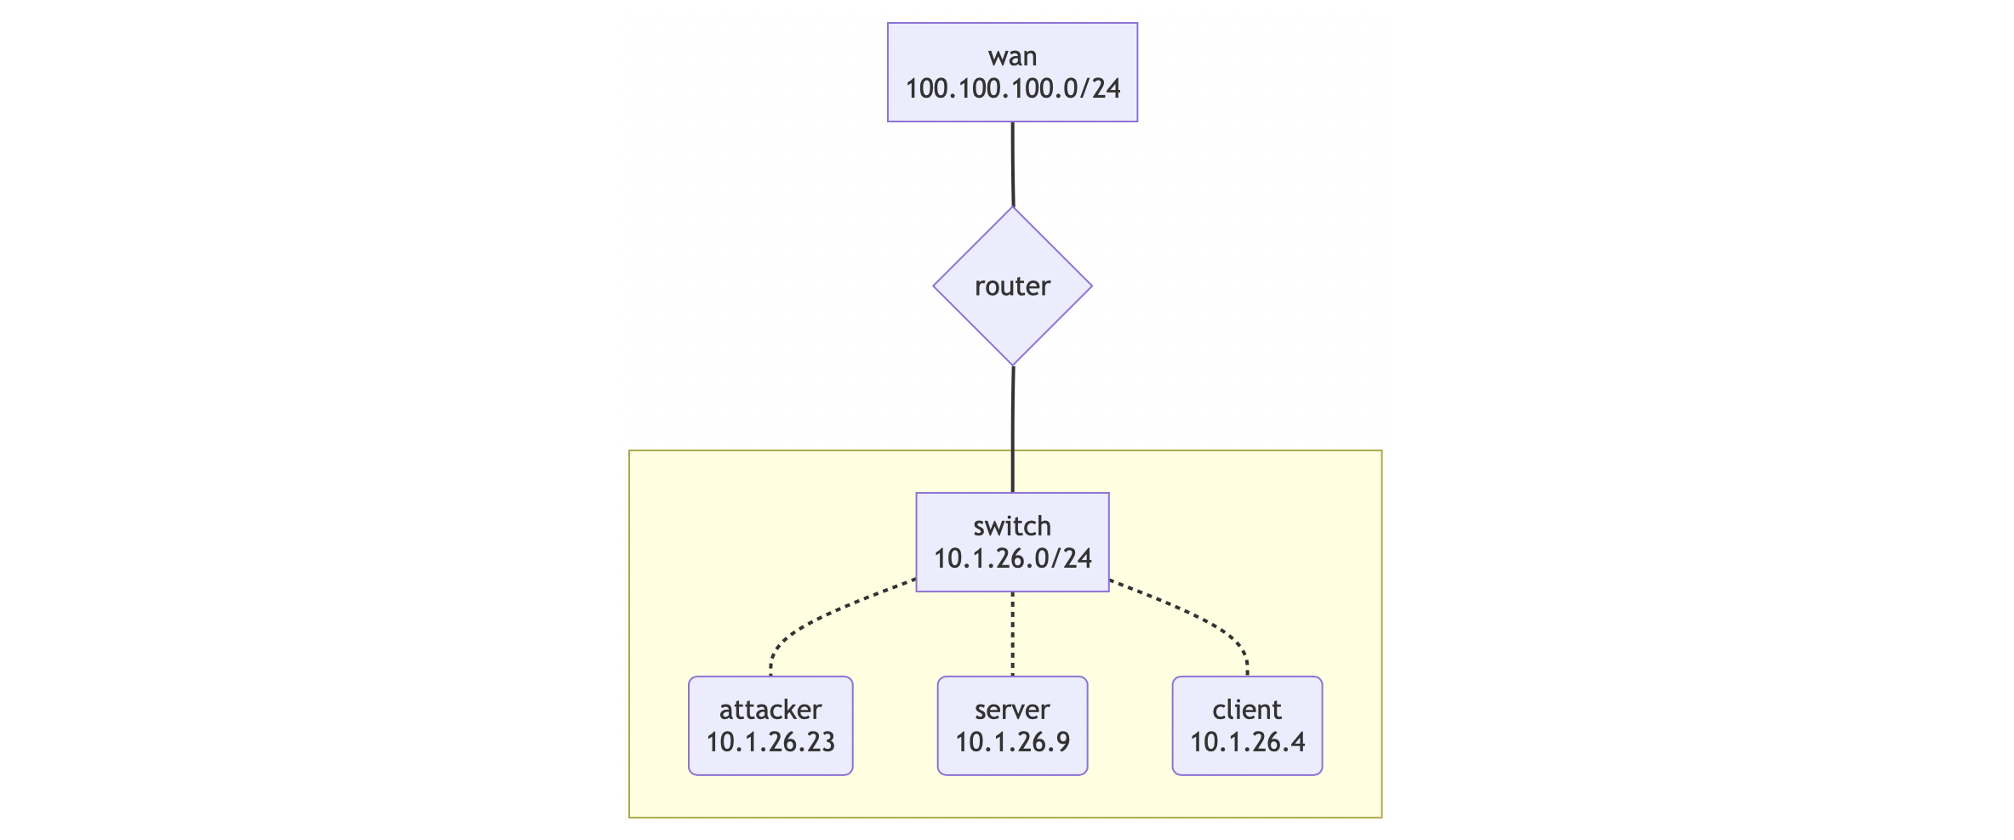
The one for junior hacker training could be found here. The content of this file is intuitive:
name: junior-hacker-sandbox

hosts:
  - name: attacker
    base_box:
      image: kali
      mgmt_user: debian
    flavor: csirtmu.tiny1x2
  - name: server
    base_box:
      image: debian-10
      mgmt_user: debian
    flavor: csirtmu.tiny1x2
  - name: client
    base_box:
      image: debian-10
      mgmt_user: debian
    flavor: csirtmu.tiny1x2

routers:
  - name: router
    base_box:
      image: debian-10
      mgmt_user: debian
    flavor: csirtmu.tiny1x2

wan:
  name: internet-connection
  cidr: 100.100.100.0/24

networks:
  - name: switch
    cidr: 10.1.26.0/24

net_mappings:
    - host: attacker
      network: switch
      ip: 10.1.26.23
    - host: server
      network: switch
      ip: 10.1.26.9
    - host: client
      network: switch
      ip: 10.1.26.4

router_mappings:
    - router: router
      network: switch
      ip: 10.1.26.1

groups: []
The topology visualization would be like:
It is recommended that we do not create a new topology from scratch, but take that one from the junior hacker training as template and derive the expected one by modifying it.
Sandbox Provisioning
To some extent, sandbox provisioning is the most important part for the creation of a training. We should not put lots of training related things like flags and exploit tools in virtual machine images. Instead, the best practice is to keep the virtual machine images as general as possible. Then, we could customize different environments by conducting different provisionings in different virtual machines spawned from general images.
The provisioning directory’s content is the same as any other Ansible projects. To create a working sandbox provisioning, we need to have some knowledge on Ansible. Besides, the one for junior hacker training could be found here, which serves as a good template as well. We can generate our new sandbox provisioning by modify it.
Virtual Machine Images
The usage of virtual machines is declared in the topology.yml file for each training, as shown in the Sandbox Definition - Topology Definition part. Even if there are four nodes within the junior hacker training (three hosts and a router), only two virtual machine images are used: kali and debian-10. As we have said, remember not to make the images too specific, which will decrease the reusability of each image, unless some provisioning steps are unstable or would take a long time.
Create A New Training: An Example
We have learnt enough knowledge on how to create a training and analysed an official example. In this section, we will share the detailed creation process of a new training: NCL-APTX4869.
The Goals
As this is the first training we create in KYPO, there are two goals:
- Walk through the whole process of creating a complex training with multi-levels, evaluate the reasonableness of each step of creation and see whether we can improve or automatize some steps to facilitate the creation task for lecturers.
- The training itself is to help students experience a penetration test against cloud native environments, and learn techniques like privilege escalation and new threats like container breakout.
The Playbook
To achieve the goals, the playbook is designed as below:
There are one attacker node (attacker) and two victim nodes (victim-01 and victim-02) within the same local network. Students need to firstly log in on the attacker node, then attack the two victim nodes one by one. Four flags are placed in different areas of these victim nodes with different access permissions.
Correspondingly, students have to conquer four different challenges to read these flags. These challenges are logically connected and linearly organized, which means one is not able to obtain the (n)th flag before overcome the (n-1)th challenge. From the view of KYPO training, each challenge is mapped to a training level in the KYPO dashboard with specific description. Students can submit each flag they obtain on the KYPO dashboard to pass the current level and enter the next level.
The architecture of this playbook is presented below:
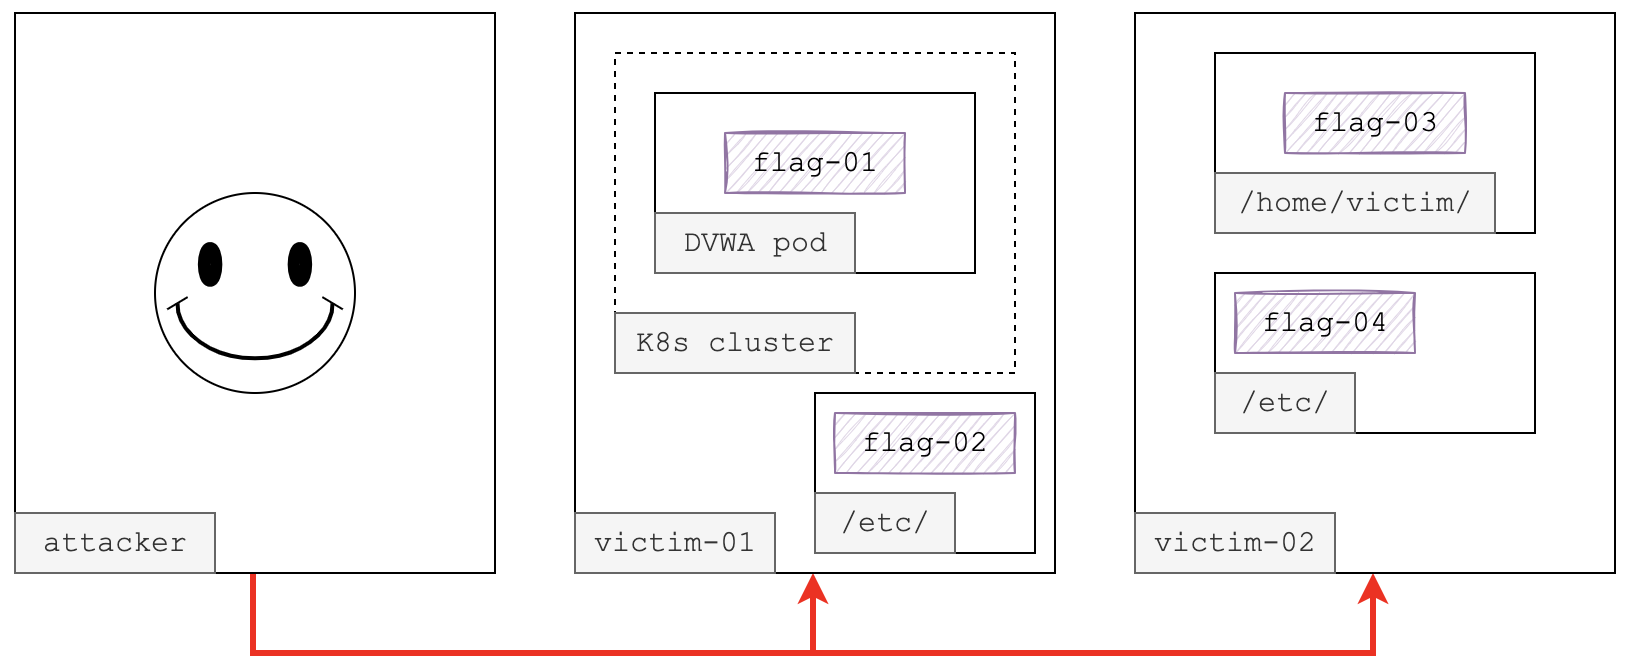
To put it more clearly, students need to:
- scan and find out the vulnerable Web service on victim-01;
- conduct Web hacking to get a shell and read flag-01;
- use the gotten webshell as foothold to gather information of the environment;
- use the gotten webshell as foothold to find out the vulnerable Web service is running in a container;
- use the gotten webshell as foothold to escape from the container, get a root shell on the victim-01 host and read flag-02;
- use the root shell of victim-01 as foothold to conduct lateral movement onto victim-02, get a shell as a non-privileged user and read flag-03;
- use the non-privileged shell as foothold to gather information of the environment, escalate privilege to root and read flag-04.
To enable the challenges described above,
- For victim-01,
- the kernel will be downgraded to
5.8.0-48-generic, which is vulnerable to CVE-2021-22555, with container breakout exploit available on GitHub; - a Kubernetes cluster will be deployed, with the container management componment containerd vulnerable to another container breakout vulnerability CVE-2020-15257;
- a DVWA pod will be deployed in the Kubernetes cluster, sharing the host network namespace;
- there will be a SUID
findprogram and a runningcronservice in the DVWA pod, which help students escalate privilege in the container, so as to exploit CVE-2021-22555 or CVE-2020-15257; - a hidden private key will be put in the
/root/directory on victim-01 host to help students laterally move onto victim-02 using SSH asvictimuser.
- the kernel will be downgraded to
- For victim-02,
- the final flag (flag-04) will be put in
/etc/with read permission only for root; - there will be a SUID
vimprogram enabling students to escalate privilege to root and read the final flag.
- the final flag (flag-04) will be put in
Training Definition
As said, there is no need for us to write the training definition manually. KYPO dashboard provides an interactive way to create training. We can design the training playbook in KYPO dashboard and export it to a JSON file. The exported definition file is here. There are seven levels within this training:
- Introduction to Training NCL-APTX4869. This level is to introduce this training.
- Get Access. This level is to help students get access to the attacker node.
- Web Hacking. This level is mapped to the first challenge with flag-01.
- Container Breakout. This level is mapped to the second challenge with flag-02.
- Lateral Movement. This level is mapped to the third challenge with flag-03.
- Privilege Escalation. This level is mapped to the fourth challenge with flag-04.
- Feedback. This level is to ask students to give some feedback to help improve this training.
Sandbox Definition
The sandbox definition task is a little difficult, but as we said, we can utilize files in junior hacker training as templates.
Topology Definition
The topology of our training is very similar to that of junior hacker training, so we can just change the virtual machine images, flavors and host names, then reuse it. You can find the topology definition for NCL-APTX4869 training here.
Sandbox Provisioning
The sandbox provisioning task is divided into common tasks and tasks for different nodes (attacker, victim-01, victim-02). You can find these tasks here.
Let’s take tasks for victim-01 for example:
➜  provisioning git:(master) ✗ tree roles/victim-01
roles/victim-01
├── files
│   ├── flag_in_ctr.txt
│   ├── flag_on_host.txt
│   └── ncl_aptx4869
├── tasks
│   └── main.yml
└── vars
    └── main.yml
You should put all the files which will be on victim-01 in the files/ directory, and then move them to the proper location by writing commands in tasks/main.yml. flag_in_ctr.txt and flag_on_host.txt are used as flag-01 and flag-02 which we have talked before. ncl_aptx4869 is the private key to be used to connect to victim-02 through SSH.
tasks/main.yml is the most important file to provision victim-01. As shown below, we use it to copy files, deploy Kubernetes cluster, deploy vulnerable Web service, install&start new service and change files’ attributes and permissions:
- name: Adding aliases
  loop: "{{ aliases | dict2items }}"
  lineinfile:
    path: /etc/hosts
    line: "{{ item.value }} {{ item.key }}"

- name: Copy flag.txt for host
  become: yes
  copy:
      src: ../files/flag_on_host.txt
      dest: /etc/flag.txt
      owner: root
      mode: '400'

- name: Copy SSH private key for 'victim-02'
  become: yes
  copy:
      src: ../files/ncl_aptx4869
      dest: /root/.ssh/.victim_02_isa
      owner: root
      mode: '600'

- name: Create K8s cluster
  become: yes
  shell: ./metarget gadget install k8s --version 1.19.5 --verbose
  args:
    chdir: /root/metarget

- name: Start DVWA
  become: yes
  shell: ./metarget appv install dvwa --host-net --verbose
  args:
    chdir: /root/metarget

- name: Wait for DVWA service to start up
  wait_for:
    port: 80

- name: Copy flag.txt for container
  become: yes
  copy:
      src: ../files/flag_in_ctr.txt
      dest: /tmp/flag_in_ctr.txt
      owner: root
      mode: '400'

- name: Get DVWA pod ID
  become: yes
  shell: kubectl get pods -n metarget | grep dvwa | cut -d' ' -f 1
  register: dvwa_pod_id

- name: Set flag.txt for container
  become: yes
  shell: kubectl cp -n metarget /tmp/flag_in_ctr.txt $dvwa_pod:/etc/flag.txt
  environment:
    dvwa_pod: "{{ dvwa_pod_id.stdout }}"

- name: Chmod flag.txt
  become: yes
  shell: kubectl exec -n metarget $dvwa_pod -- chmod 444 /etc/flag.txt
  environment:
    dvwa_pod: "{{ dvwa_pod_id.stdout }}"

- name: Set set-uid for 'find' command in container
  become: yes
  shell: kubectl exec -it -n metarget $dvwa_pod -- chmod u+s /usr/bin/find
  environment:
    dvwa_pod: "{{ dvwa_pod_id.stdout }}"

- name: apt update
  become: yes
  shell: kubectl exec -it -n metarget $dvwa_pod -- apt update
  environment:
    dvwa_pod: "{{ dvwa_pod_id.stdout }}"

- name: apt install cron
  become: yes
  shell: kubectl exec -it -n metarget $dvwa_pod -- apt install -y cron
  environment:
    dvwa_pod: "{{ dvwa_pod_id.stdout }}"

- name: start cron
  become: yes
  shell: kubectl exec -it -n metarget $dvwa_pod -- service cron start
  environment:
    dvwa_pod: "{{ dvwa_pod_id.stdout }}"
One thing to be noted is that you may have to debug your provisioning to make sure it works. The way to debug a sandbox is the same as normal usage. Because of some weird designs of KYPO, you have to:
- commit and push the training repository onto GitHub;
- delete the bare repository of this training in the git-internal.kypo pod within KYPO’s Kubernetes cluster if you have imported the training before;
- modify the git-internal.kypo deployment in the KYPO kubernetes clusters with
kubectl edit:- delete the
git clone -q --bareline for this training if you have imported the training before, save and exit; - wait some seconds and readd the
git clone -q --bareline for this training withkubectl edit;
- delete the
- delete any sandbox, pool and sandbox definition related to the old training;
- create a new sandbox definition with the new commit ID (important);
- create a new pool with the new sandbox definition and allocate a sandbox to test whether it runs as expected.
Finally, after some potential debugging work, the sandbox works as you expect. Congrats! You complete the most important step.
Virtual Machine Images
Besides sandbox provisioning, we should create virtual machine images ourselves and upload them onto the underlying OpenStack, so that KYPO can spawn new virtual machines for our sandbox. Actually, KYPO has provided a repositorty where files and documents for creating common images are available.
If we want to customize a specific image, e.g., downgrade the kernel of it, we can just spawn a virtual machine from one of the common images created before, and then follow the commands below in the OpenStack context (credit to Yuancheng):
openstack server list
# take a instance snapshot
openstack server image create --name myInstanceSS <name of instance that is shutdown>
# repeat a few to until the status for myInstanceSS is active.
# It should be saving for a while.
watch -n 5 openstack image list
openstack image save --file snapshot.raw <uuid of image from previous cmd>
openstack image create --container-format bare --disk-format qcow2 --file snapshot.raw <new image name> --public
Summary
In this post, we analyse a training sample in KYPO and create a more complex training based on it. By designing and implementing this training, we find:
- KYPO is suitable for cybersecurity teaching.
- Lecturers need to be familiar with Ansible and OpenStack to create a new training.
- The whole process of creating a new training is a little complex and may require some debugging work.
Besides, another thing we find is that it is important but a little difficult to constrain unintended access controls and privileges to avoid unexpected solutions in KYPO.
Anyway, students may have an awesome cybersecurity adventure in KYPO :)