1. 前言
近期做项目时,我了解了syzkaller1和syzbot2这两个Linux内核安全领域的明星项目;另外,master阶段的最后一门课程恰巧也有Fuzzing的内容和作业。因此,我打算通过写一篇实践笔记来记录自己的探索过程。本文分为上下两篇(转到上篇),主要内容是对《The Fuzzing Book》在线教程3(后文简称TFB)初级内容的学习实践总结(覆盖章节如图1所示),也会引用一些其他资料。
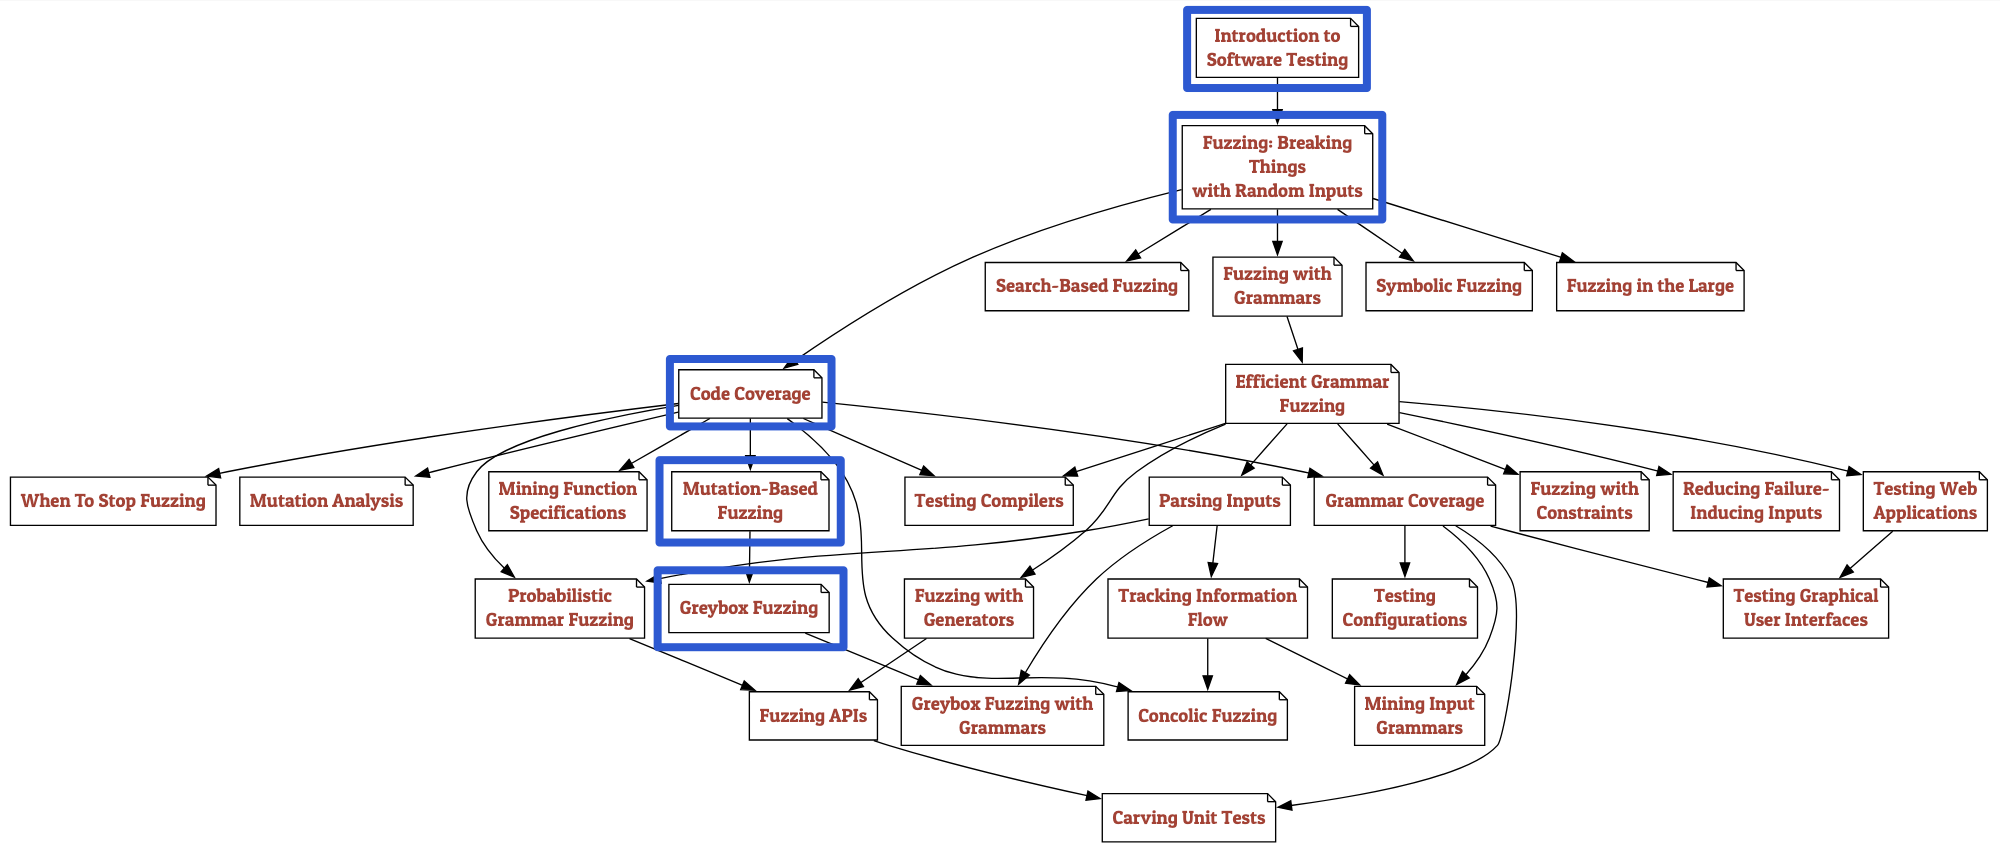 图1 - TFB学习路线及本笔记覆盖内容
2. TFB:Mutation-based Fuzzing
本节内容主要基于TFB相关章节4完成。
纯粹的随机input很容易被程序中的数据验证逻辑判定为非法输入,导致程序终止,无法对更深的逻辑进行测试。既要尽量确保input合法,又要确保coverage尽量大,一种思路是mutate已有的input来生成新的合法input。
2.1 Fuzzing URL Parser
结合前文内容,我们来fuzz下面这个极简HTTP函数:
def http_program(url: str) -> bool:
    supported_schemes = ["http", "https"]
    result = urlparse(url)
    if result.scheme not in supported_schemes:
        raise ValueError("Scheme must be one of " +
                         repr(supported_schemes))
    if result.netloc == '': raise ValueError("Host must be non-empty")
    # Do something with the URL
    return True
根据Python相关文档5,URL的格式规范如下:
scheme://netloc/path?query#fragment
urlparse模块已经很好地实现了对上述规范的遵守和检查。因此,我们不能使用完全随机的input,理想的input应该能通过urlparse检查,同时仍然能够用于fuzz目标函数。如前所述,我们可以先给出一个合法input,然后mutate它来产生新的input。字符串Mutation包括“插入字符”、“删除字符”、“翻转字符中的bit”等,这些操作的实现非常简单:
def delete_random_character(s: str) -> str:
    if s == "": return s
    pos = random.randint(0, len(s) - 1)
    return s[:pos] + s[pos + 1:]

def insert_random_character(s: str) -> str:
    pos = random.randint(0, len(s))
    random_character = chr(random.randrange(32, 127))
    return s[:pos] + random_character + s[pos:]

def flip_random_character(s):
    if s == "": return s
    pos = random.randint(0, len(s) - 1)
    c = s[pos]
    bit = 1 << random.randint(0, 6)
    new_c = chr(ord(c) ^ bit)
    return s[:pos] + new_c + s[pos + 1:]

def mutate(s: str) -> str:
    mutators = [
        delete_random_character,
        insert_random_character,
        flip_random_character]
    mutator = random.choice(mutators)
    return mutator(s)
尝试应用这个mutation,结果显示它能够有效生成合法URLs:
def is_valid_url(url: str) -> bool:
    try:
        result = http_program(url)
        return True
    except ValueError: return False

seed_input = "http://www.google.com/search?q=fuzzing"
valid_inputs = set()
trials = 20

for i in range(trials):
    inp = mutate(seed_input)
    if is_valid_url(inp): valid_inputs.add(inp)

# len(valid_inputs) / trials is 0.85
2.2 Multiple Mutations
事实上,我们可以在一次生成中进行多次mutation。为了以后复用,我们实现一个MutationFuzzer:
class MutationFuzzer(Fuzzer):
    def __init__(self, seed: List[str],
                 min_mutations: int = 2,
                 max_mutations: int = 10) -> None:
        self.seed = seed
        self.min_mutations = min_mutations
        self.max_mutations = max_mutations
        self.reset()

    def reset(self) -> None:
        self.population = self.seed
        self.seed_index = 0

    def mutate(self, inp: str) -> str: return mutate(inp) # implemented before

    def create_candidate(self) -> str:
        candidate = random.choice(self.population)
        trials = random.randint(self.min_mutations, self.max_mutations)
        for i in range(trials): candidate = self.mutate(candidate)
        return candidate

    def fuzz(self) -> str:
        if self.seed_index < len(self.seed):
            # Still seeding
            self.inp = self.seed[self.seed_index]
            self.seed_index += 1
        else: self.inp = self.create_candidate()
        return self.inp
其中,fuzz方法会先遍历seeds,然后再mutate。下面我们对上面的MutationFuzzer进行测试:
seed_input = "http://www.google.com/search?q=fuzzing"
mutation_fuzzer = MutationFuzzer(seed=[seed_input])
mutation_fuzzer.fuzz()

# 'http://#wJww.google.com/search?q=fuzzing'
# 'htt*p://www.google.com/se`rch?q=buzzing'
# ...
测试结果暴露出一个问题:mutation过多会生成许多非法URL。我们需要使用coverage作为导向来解决这个问题。
2.3 Guiding by Coverage
本小节借鉴了AFL的策略——基于现有的导致新代码路径被覆盖的inputs做mutation;如果某个input覆盖了新路径,就继续保留它。
下面我们首先实现一个基础的FunctionRunner:
from Fuzzer import Runner

class FunctionRunner(Runner):
    def __init__(self, function: Callable) -> None:
        self.function = function

    def run_function(self, inp: str) -> Any: return self.function(inp)

    def run(self, inp: str) -> Tuple[Any, str]:
        try:
            result = self.run_function(inp)
            outcome = self.PASS
        except Exception:
            result = None
            outcome = self.FAIL
        return result, outcome
然后将它拓展为支持coverage的FunctionCoverageRunner:
from Coverage import Coverage, population_coverage, Location

class FunctionCoverageRunner(FunctionRunner):
    def run_function(self, inp: str) -> Any:
        with Coverage() as cov:
            try: result = super().run_function(inp)
            except Exception as exc:
                self._coverage = cov.coverage()
                raise exc
        self._coverage = cov.coverage()
        return result

    def coverage(self) -> Set[Location]: return self._coverage
其中,我们在run_function方法中为函数执行记录了coverage。简单测试一下:
http_runner = FunctionCoverageRunner(http_program)
res = http_runner.run("https://foo.bar/")
print(f"res: {res}, LoC coverage: {len(http_runner.coverage())}")

# res: (True, 'PASS'), LoC coverage: 31
接下来是用于产生input的MutationCoverageFuzzer,Coverage导向作用也体现在这里(保存历史coverage记录并比较):
class MutationCoverageFuzzer(MutationFuzzer):
    def reset(self) -> None:
        super().reset()
        self.coverages_seen: Set[frozenset] = set()
        self.population = []

    def run(self, runner: FunctionCoverageRunner) -> Any:  # type: ignore
        result, outcome = super().run(runner)
        new_coverage = frozenset(runner.coverage())
        if outcome == Runner.PASS and new_coverage not in self.coverages_seen:
            self.population.append(self.inp)
            self.coverages_seen.add(new_coverage)
        return result
这次的mutation结果就好多了:
seed_input = "http://www.google.com/search?q=fuzzing"
mutation_fuzzer = MutationCoverageFuzzer(seed=[seed_input])
mutation_fuzzer.runs(http_runner, trials=10000)
mutation_fuzzer.population

#  'http://www.gIoogle.com/searci?q=fuzing',
#  "http://www.'ogle.com/search?q=fuz{in",
# ...
2.4 Fuzzing CGI decode with Mutations
我们使用前面构建的fuzzer和runner来测试一下Python版的cgi_decode6:
seed = ["Hello World"]
cgi_runner = FunctionCoverageRunner(cgi_decode)
m = MutationCoverageFuzzer(seed)
results = m.runs(cgi_runner, 10000)

# Finally, m.population is like
# ['Hello World', 'Hmlo +Vond', 'Hm%01lOgy Vd', 'Hm%01OGy+ VeO']
最终的m.population显示,coverage导向的mutation能够生成合法的测试用例。进一步地,我们用matplotlib将coverage随m.population的变化情况可视化:
all_coverage, cumulative_coverage = population_coverage(m.population, cgi_decode)
import matplotlib.pyplot as plt
plt.plot(cumulative_coverage)
plt.title('Coverage of cgi_decode() with random inputs')
plt.xlabel('# of inputs')
plt.ylabel('lines covered');
图2展示的曲线同样反向验证了这一点:
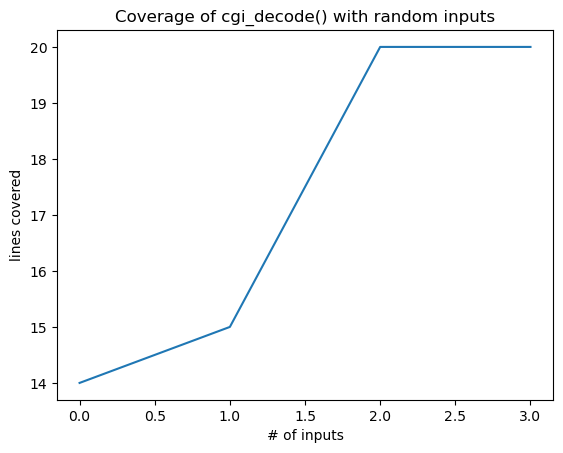 图2 - Coverage变化曲线
3. TFB:Greybox Fuzzing
本节内容主要基于TFB相关章节7完成,相关算法来源于AFL。
作为一个greybox fuzzer,AFL依靠coverage-feedback来指导mutation,它使用轻量的程序编译时插桩(instrumentation)来获得生成的input触发的branch coverage信息。如果这个input增大了coverage,它就被加入到seed corpus中供接下来的fuzzing使用。具体而言,AFL会在被测程序的每个条件跳转指令后插入一段代码,用于为当前分支分配一个ID,并增加该分支的关联counter。出于效率的考量,AFL只维护一个粗粒度的“branch命中计数”。然而,借助QEMU等虚拟化工具或Intel PinTool8等动态插桩工具,AFL也可以用于测试无插桩二进制程序。对于Python程序来说,我们无需插桩即可获得coverage信息。
3.1 Ingredients for Greybox Fuzzing
首先,我们将之前的mutate函数封装成一个Mutator类:
class Mutator:
    def __init__(self) -> None:
        self.mutators = [
            self.delete_random_character,
            self.insert_random_character,
            self.flip_random_character]

    def insert_random_character(self, s: str) -> str:
        pos = random.randint(0, len(s))
        random_character = chr(random.randrange(32, 127))
        return s[:pos] + random_character + s[pos:]

    def delete_random_character(self, s: str) -> str:
        if s == "": return self.insert_random_character(s)
        pos = random.randint(0, len(s) - 1)
        return s[:pos] + s[pos + 1:]

    def flip_random_character(self, s: str) -> str:
        if s == "": return self.insert_random_character(s)
        pos = random.randint(0, len(s) - 1)
        c = s[pos]
        bit = 1 << random.randint(0, 6)
        new_c = chr(ord(c) ^ bit)
        return s[:pos] + new_c + s[pos + 1:]

    def mutate(self, inp: Any) -> Any:  # can be str or Seed (see below)
        mutator = random.choice(self.mutators)
        return mutator(inp)
接下来,我们引入“power schedule”的概念,它决定了fuzzing时间在seeds中的分配。我们的目标是,将更多的时间投入在那些在更短时间内可能带来产生更高coverage的seeds(来自population)。在这个定义下,我们将一个seed被选中的概率定义为它的energy。Power schedule就是为一个seed确定其energy的过程。AFL的schedule是将更多的energy分配给更短、执行更快、能够更频繁提高coverage的seeds。自然而然地,我们需要先定义一个Seed类:
from Coverage import Location

class Seed:
    def __init__(self, data: str) -> None:
        self.data = data
        self.coverage: Set[Location] = set()
        self.distance: Union[int, float] = -1
        self.energy = 0.0

    def __str__(self) -> str: return self.data

    __repr__ = __str__
现在可以定义PowerSchedule类了。目前,下面这个实现为每个seed分配相等的energy:
class PowerSchedule:
    def __init__(self) -> None: self.path_frequency: Dict = {}

    def assignEnergy(self, population: Sequence[Seed]) -> None:
        for seed in population: seed.energy = 1

    def normalizedEnergy(self, population: Sequence[Seed]) -> List[float]:
        energy = list(map(lambda seed: seed.energy, population))
        sum_energy = sum(energy)  # Add up all values in energy
        assert sum_energy != 0
        return list(map(lambda nrg: nrg / sum_energy, energy))

    def choose(self, population: Sequence[Seed]) -> Seed:
        self.assignEnergy(population)
        norm_energy = self.normalizedEnergy(population)
        return random.choices(population, weights=norm_energy)[0]
3.2 Advanced Blackbox Mutation-based Fuzzing
现在的任务是将Mutator、Seed和PowerSchedule整合起来,制作一个fuzzer:
class AdvancedMutationFuzzer(Fuzzer):
    def __init__(self, seeds: List[str],
                 mutator: Mutator,
                 schedule: PowerSchedule) -> None:
        self.seeds = seeds
        self.mutator = mutator
        self.schedule = schedule
        self.inputs: List[str] = []
        self.reset()

    def reset(self) -> None:
        self.population = list(map(lambda x: Seed(x), self.seeds))
        self.seed_index = 0

    def create_candidate(self) -> str:
        seed = self.schedule.choose(self.population)
        candidate = seed.data
        trials = min(len(candidate), 1 << random.randint(1, 5))
        for i in range(trials): candidate = self.mutator.mutate(candidate)
        return candidate

    def fuzz(self) -> str:
        if self.seed_index < len(self.seeds):
            self.inp = self.seeds[self.seed_index]
            self.seed_index += 1
        else: self.inp = self.create_candidate()
        self.inputs.append(self.inp)
        return self.inp
这个fuzzer目前没有考虑coverage,是blackbox fuzzer。我们用它测试下面这个函数:
def crashme(s: str) -> None:
    if len(s) > 0 and s[0] == 'b':
        if len(s) > 1 and s[1] == 'a':
            if len(s) > 2 and s[2] == 'd':
                if len(s) > 3 and s[3] == '!':
                    raise Exception()
结果显示,该fuzzer在测试中表现一般,只覆盖2条语句,对应的inputs是:
['good', 'bo']
3.3 Greybox Mutation-Based Fuzzing
在AdvancedMutationFuzzer的基础上,我们增加coverage机制:
class GreyboxFuzzer(AdvancedMutationFuzzer):
    def reset(self):
        super().reset()
        self.coverages_seen = set()
        self.population = []  # population is filled during greybox fuzzing

    def run(self, runner: FunctionCoverageRunner) -> Tuple[Any, str]:  # type: ignore
        result, outcome = super().run(runner)
        new_coverage = frozenset(runner.coverage())
        if new_coverage not in self.coverages_seen:
            seed = Seed(self.inp)
            seed.coverage = runner.coverage()
            self.coverages_seen.add(new_coverage)
            self.population.append(seed)
        return (result, outcome)
这一次,测试显示coverage有所增加,多覆盖了2条语句。相应的seeds如下:
[good, bo, baof, bad4u]
图3的coverage曲线清晰地展示了两个fuzzer的差异:
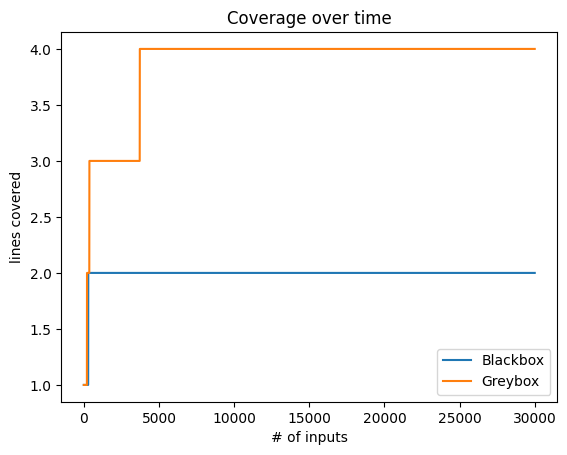 图3 - Greybox fuzzer与blackbox fuzzer的coverage对比
3.4 Boosted Greybox Fuzzing
下面,我们采用类似AFL的策略——给不同的seed分配不同的energy。
首先,我们实现一个getPathID函数,用于为给定coverage patch生成一个独特ID:
def getPathID(coverage: Any) -> str:
    pickled = pickle.dumps(sorted(coverage))
    return hashlib.md5(pickled).hexdigest()
接下来考虑如何分配energy。这里采用一种指数分配策略(exponential power schedule),按照如下公式为给定seed $s$计算energy $e(s)$: $$ e(s) = \frac{1}{f(p(s))^a} $$ 其中$p(s)$是给定seed $s$触发的path的ID;$f(p)$返回该path的执行次数;$a$是给定的幂。
有了以上基础,我们实现一个AFLFastSchedule:
class AFLFastSchedule(PowerSchedule):
    def __init__(self, exponent: float) -> None:
        self.exponent = exponent

    def assignEnergy(self, population: Sequence[Seed]) -> None:
        for seed in population:
            seed.energy = 1 / (self.path_frequency[getPathID(seed.coverage)] ** self.exponent)
并在GreyboxFuzzer的基础上实现一个CountingGreyboxFuzzer,记录path访问次数:
class CountingGreyboxFuzzer(GreyboxFuzzer):
    def reset(self):
        super().reset()
        self.schedule.path_frequency = {}

    def run(self, runner: FunctionCoverageRunner) -> Tuple[Any, str]:
        result, outcome = super().run(runner)
        path_id = getPathID(runner.coverage())
        if path_id not in self.schedule.path_frequency:
            self.schedule.path_frequency[path_id] = 1
        else: self.schedule.path_frequency[path_id] += 1
        return(result, outcome)
最后,我们将AFLFastSchedule与CountingGreyboxFuzzer结合起来测试,结果不错:
n = 10000
seed_input = "good"
fast_schedule = AFLFastSchedule(5)
fast_fuzzer = CountingGreyboxFuzzer([seed_input], Mutator(), fast_schedule)
fast_fuzzer.runs(FunctionCoverageRunner(crashme), trials=n)

fast_energy = fast_schedule.normalizedEnergy(fast_fuzzer.population)
for (seed, norm_energy) in zip(fast_fuzzer.population, fast_energy):
    print("'%s', %0.5f, %s" % (getPathID(seed.coverage),
                               norm_energy, repr(seed.data)))

# 'e014b68ad4f3bc2daf207e2498d14cbf', 0.00000, 'good'
# '0a1008773804033d8a4c0e3aba4b96a0', 0.00000, 'bnd'
# 'eae4df5b039511eac56625f47c337d24', 0.00030, 'ba.'
# 'b14f545c3b39716a455034d9a0c61b8c', 0.02464, 'bad.'
# '11529f85aaa30be08110f3076748e420', 0.97506, 'bad!\\.'
另外的测试表明(如图4所示),AFLFastSchedule比默认的PowerSchedule更快达到最大coverage:
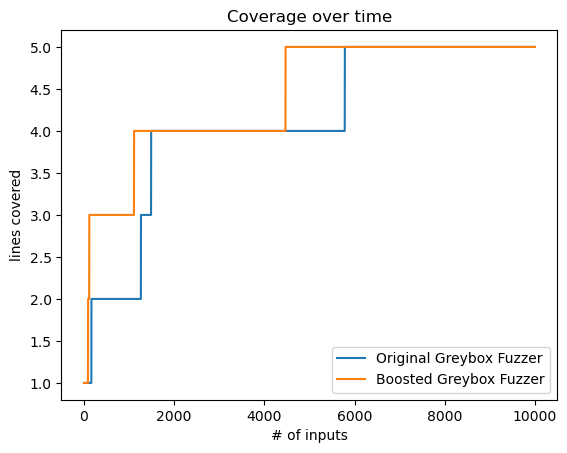 图4 - AFLFastSchedule与默认PowerSchedule的coverage对比
3.5 A Complex Example: HTMLParser
让我们用前面实现的三个fuzzer测试同一个现实中使用的程序——HTMLParser:
from html.parser import HTMLParser

def my_parser(inp: str) -> None:
    parser = HTMLParser()  # resets the HTMLParser object for every fuzz input
    parser.feed(inp)

n = 5000
seed_input = " "  # empty seed
blackbox_fuzzer = AdvancedMutationFuzzer([seed_input], Mutator(), PowerSchedule())
greybox_fuzzer = GreyboxFuzzer([seed_input], Mutator(), PowerSchedule())
boosted_fuzzer = CountingGreyboxFuzzer([seed_input], Mutator(), AFLFastSchedule(5))

blackbox_fuzzer.runs(FunctionCoverageRunner(my_parser), trials=n)
greybox_fuzzer.runs(FunctionCoverageRunner(my_parser), trials=n)
boosted_fuzzer.runs(FunctionCoverageRunner(my_parser), trials=n)

_, black_coverage = population_coverage(blackbox_fuzzer.inputs, my_parser)
_, grey_coverage = population_coverage(greybox_fuzzer.inputs, my_parser)
_, boost_coverage = population_coverage(boosted_fuzzer.inputs, my_parser)
line_black, = plt.plot(black_coverage, label="Blackbox Fuzzer")
line_grey, = plt.plot(grey_coverage, label="Greybox Fuzzer")
line_boost, = plt.plot(boost_coverage, label="Boosted Greybox Fuzzer")
plt.legend(handles=[line_boost, line_grey, line_black])
plt.title('Coverage over time')
plt.xlabel('# of inputs')
plt.ylabel('lines covered');
测试结果(图5)显示,两个greybox fuzzer的表现都要比blackbox fuzzer好:
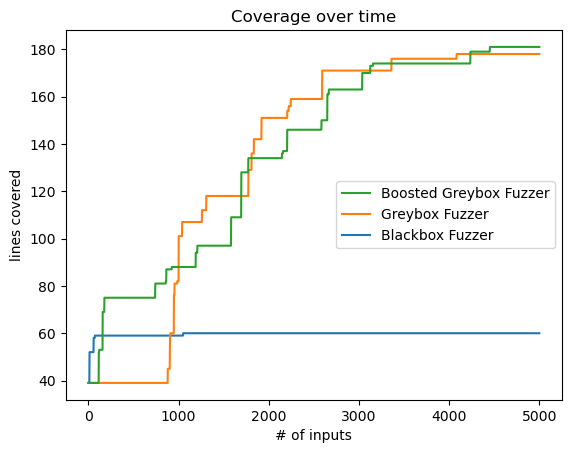 图5 - 三个fuzzer在HTMLParser测试上的coverage对比
3.6 Directed Greybox Fuzzing
有时,我们需要fuzzer触达程序中的指定位置(如某个你认为可能存在漏洞的地方),而不是全面铺开测试。Directed greybox fuzzing(DGF)可以满足这种需求。这一节,我们结合一个经典的迷宫案例9来学习DGF:
maze_string = """
+-+-----+
|X|     |
| | --+ |
| |   | |
| +-- | |
|     |#|
+-----+-+
"""
这个迷宫由字符串表示,然后由generate_maze_code根据该字符串生成一个maze_code;我们使用exec执行它,得到真正的迷宫函数maze:
from ControlFlow import generate_maze_code

def maze(s: str) -> str:
    return ""  # Will be overwritten by exec()

def target_tile() -> str:
    return ' '  # Will be overwritten by exec()

maze_code = generate_maze_code(maze_string)
exec(maze_code)
然后就可以走迷宫了:
# Appending one more 'D', you have reached the target.
print(maze("DDDDRRRRUULLUURRRRDDDD"))

# SOLVED

# +-+-----+
# | |     |
# | | --+ |
# | |   | |
# | +-- | |
# |     |X|
# +-----+-+
迷宫的实现原理很简单——maze_string中的每个字符都代表一块“地砖”(包括空格),程序为每个地砖生成一个地砖函数。为了fuzzing方便,迷宫处理函数遇到非DULR字符会跳过。如果当前地砖是空格,输入方向(DULR)上的下一个地砖函数被调用;如果当前地砖是+|-,返回INVALID;如果当前地砖是#,返回SOLVED。ControlFlow模块中的callgraph函数能够将maze_code可视化(图6),我们可以看到迷宫的函数调用实现:
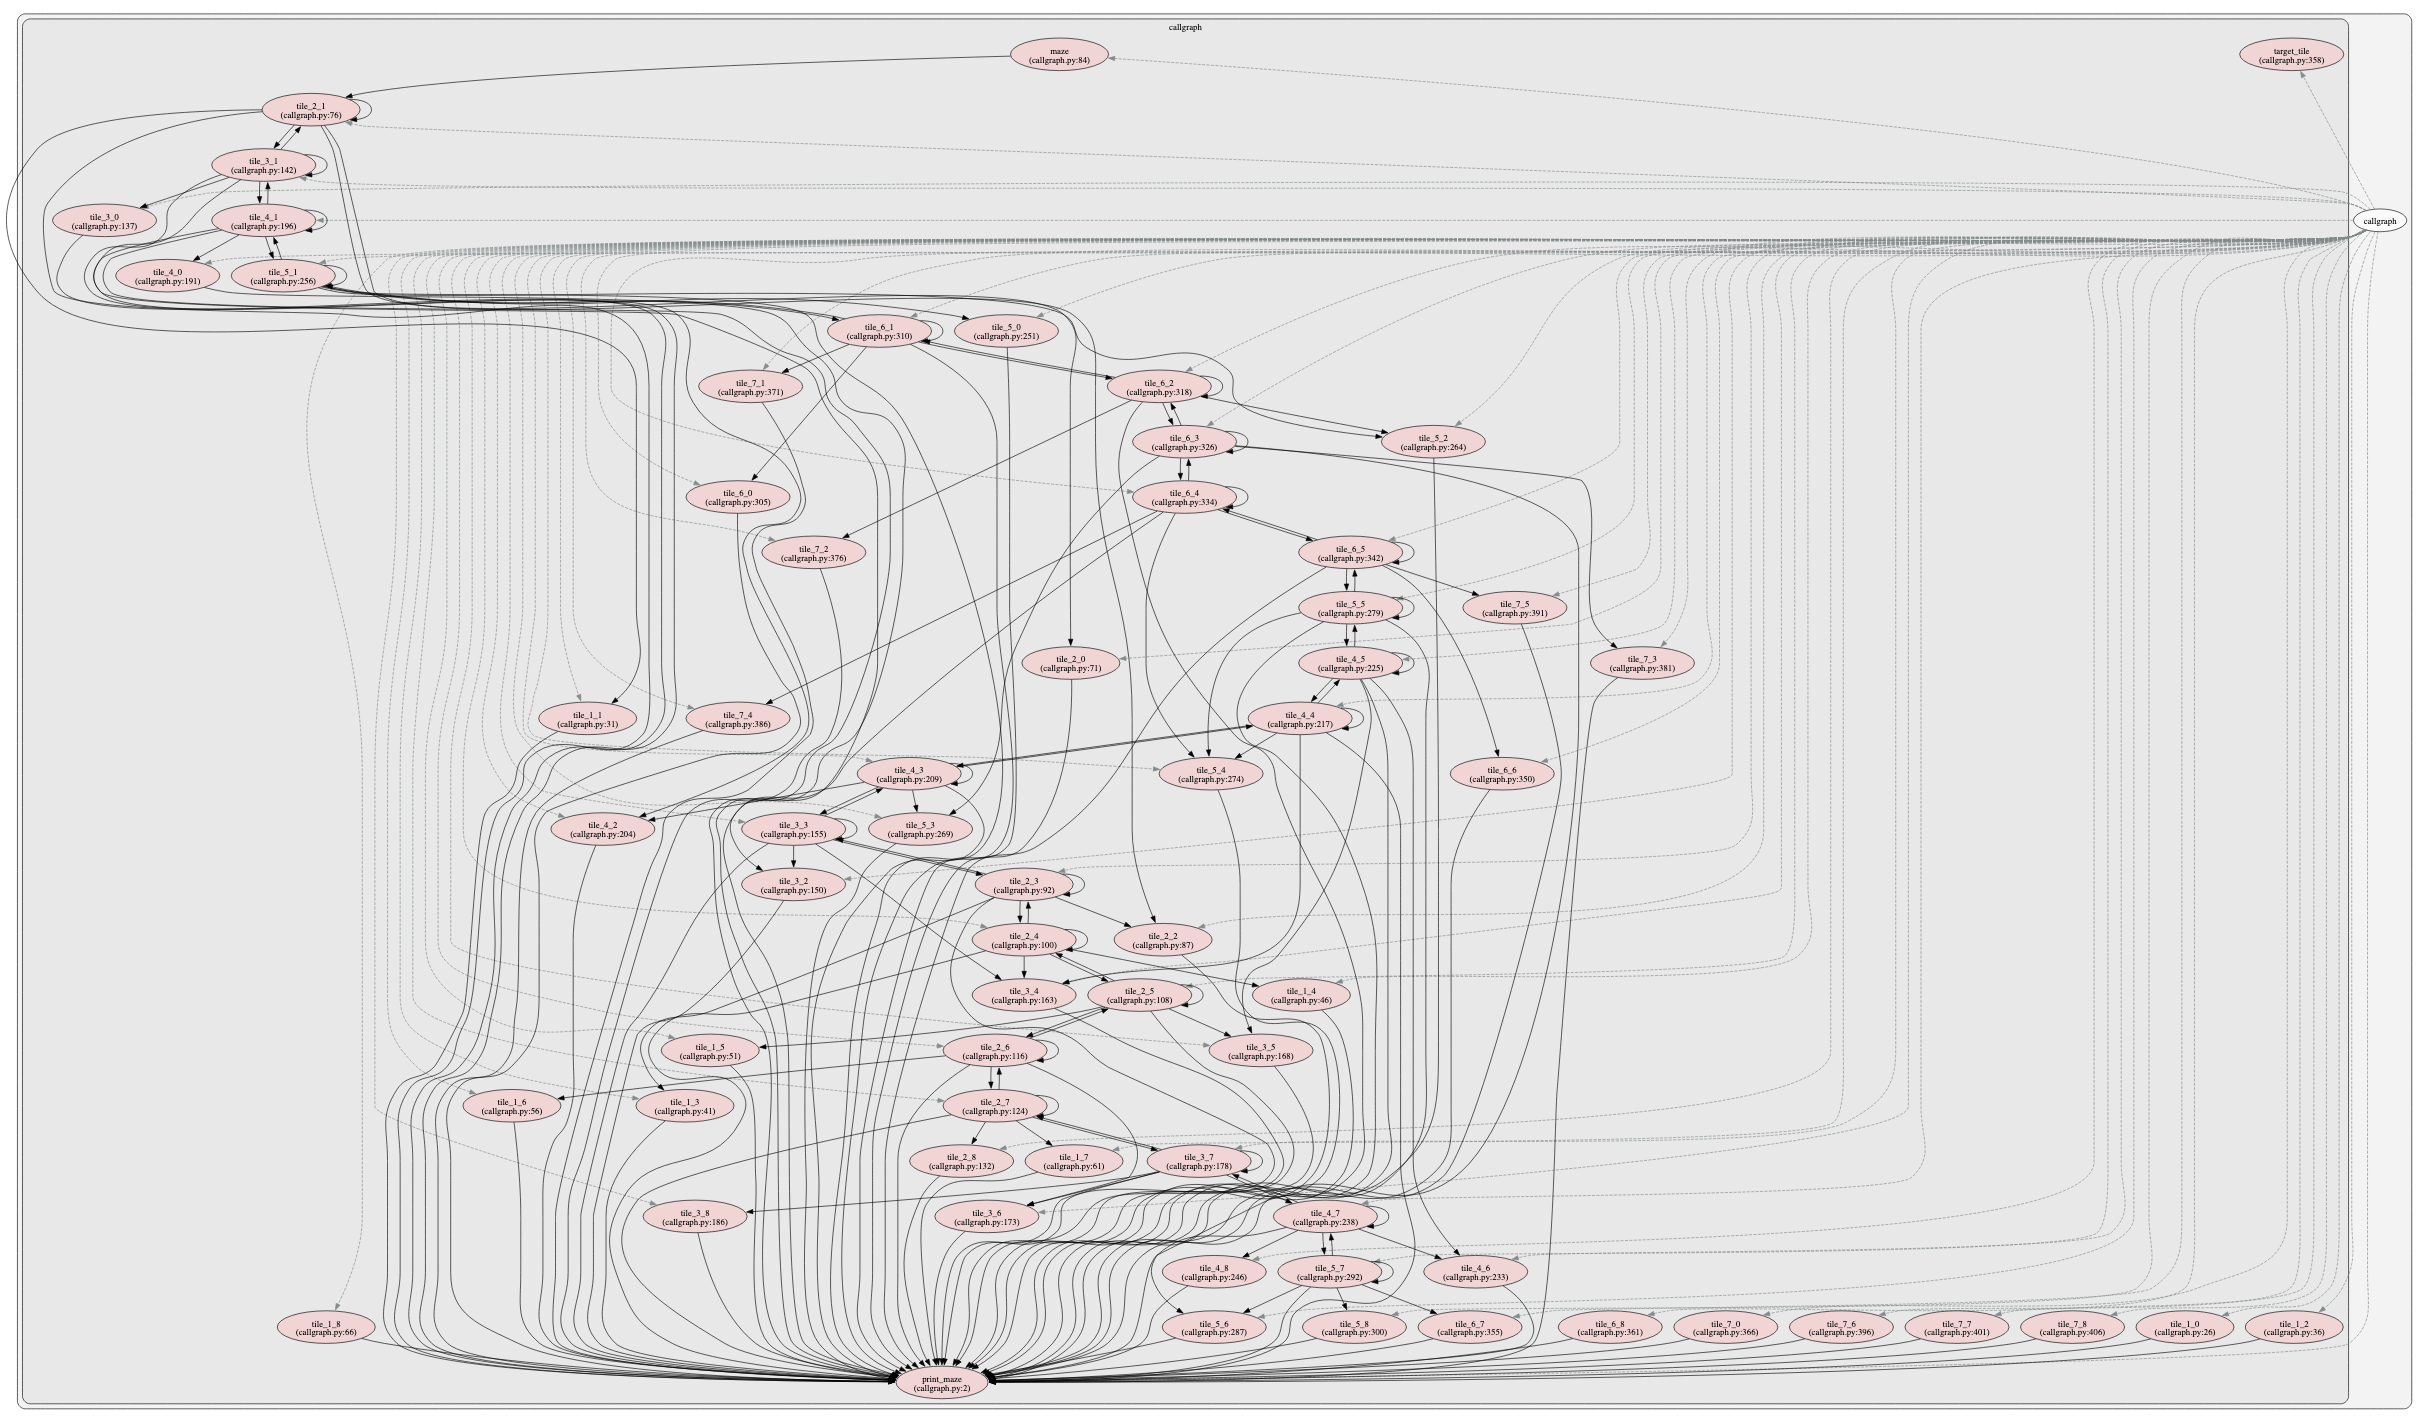 图6 - 迷宫的函数调用图
由于迷宫的输入是受限的(只有DULR),我们首先实现一个基于字典的mutator:
class DictMutator(Mutator):
    def __init__(self, dictionary: Sequence[str]) -> None:
        super().__init__()
        self.dictionary = dictionary
        self.mutators.append(self.insert_from_dictionary)

    def insert_from_dictionary(self, s: str) -> str:
        pos = random.randint(0, len(s))
        random_keyword = random.choice(self.dictionary)
        return s[:pos] + random_keyword + s[pos:]
然后在此基础上实现能够在输入序列尾部拼接的方法,模拟走迷宫:
class MazeMutator(DictMutator):
    def __init__(self, dictionary: Sequence[str]) -> None:
        super().__init__(dictionary)
        self.mutators.append(self.delete_last_character)
        self.mutators.append(self.append_from_dictionary)

    def append_from_dictionary(self, s: str) -> str:
        random_keyword = random.choice(self.dictionary)
        return s + random_keyword

    def delete_last_character(self, s: str) -> str:
        if len(s) > 0: return s[:-1]
        return s
下面简单测试一下:
n = 20000
seed_input = " "  # empty seed
maze_mutator = MazeMutator(["L", "R", "U", "D"])
maze_schedule = PowerSchedule()
maze_fuzzer = GreyboxFuzzer([seed_input], maze_mutator, maze_schedule)
maze_fuzzer.runs(FunctionCoverageRunner(maze), trials=n)
统计下来,结果比较难看:
Out of 1398 seeds,
*    0 solved the maze,
*  270 were valid but did not solve the maze, and
* 1128 were invalid
我们再将schedule和fuzzer分别换成AFLFastSchedule和CountingGreyboxFuzzer试一下。相比之前,这次测试跑了很久(26分钟),结果看起来好一些,但是依然没有一次走完迷宫:
Out of 2752 seeds,
*    0 solved the maze,
*  828 were valid but did not solve the maze, and
* 1924 were invalid
接下来,我们尝试用function-level distance来指导power schedule——利用call graph(CF)计算不同地砖函数到#地砖对应的目标函数的最小距离:
import networkx as nx
from ControlFlow import get_callgraph

target = target_tile()
cg = get_callgraph(maze_code)
for node in cg.nodes():
    if target in node:
        target_node = node
        break

distance = {}
for node in cg.nodes():
    if "__" in node: name = node.split("__")[-1]
    else: name = node
    try: distance[name] = nx.shortest_path_length(cg, node, target_node)
    except: distance[name] = 0xFFFF
我们实现一个基于距离的schedule,把更多energy分配给到达目标函数平均距离更小的seeds:
class DirectedSchedule(PowerSchedule):
    def __init__(self, distance: Dict[str, int], exponent: float) -> None:
        self.distance = distance
        self.exponent = exponent

    def __getFunctions__(self, coverage: Set[Location]) -> Set[str]:
        functions = set()
        for f, _ in set(coverage): functions.add(f)
        return functions

    def assignEnergy(self, population: Sequence[Seed]) -> None:
        for seed in population:
            if seed.distance < 0:
                num_dist = 0
                sum_dist = 0
                for f in self.__getFunctions__(seed.coverage):
                    if f in list(self.distance):
                        sum_dist += self.distance[f]
                        num_dist += 1
                seed.distance = sum_dist / num_dist
                seed.energy = (1 / seed.distance) ** self.exponent
每个seed的距离由它的coverage计算得来: $$ d(i,t)=\dfrac{\sum_{s\in CG} d_f(s,t)}{|CG|} $$ 其中$d(i,t)$是种子$i$到目标函数$t$之间的距离;$d_f(s,t)$是函数$s$到目标函数$t$之间的距离($s$来自seed的coverage)。
结果显示,虽然这个schedule也没能完全解决迷宫问题,但是要比AFLFastSchedule和CountingGreyboxFuzzer的组合表现好:
directed_schedule = DirectedSchedule(distance, 3)
directed_fuzzer = GreyboxFuzzer([seed_input], maze_mutator, directed_schedule)
directed_fuzzer.runs(FunctionCoverageRunner(maze), trials=n)
print_stats(directed_fuzzer)

# Out of 2994 seeds,
# *    0 solved the maze,
# * 1050 were valid but did not solve the maze, and
# * 1944 were invalid
图7展示了seeds的距离分布:
y = [seed.distance for seed in directed_fuzzer.population]
x = range(len(y))
plt.scatter(x, y)
plt.ylim(0, max(y))
plt.xlabel("Seed ID")
plt.ylabel("Distance");
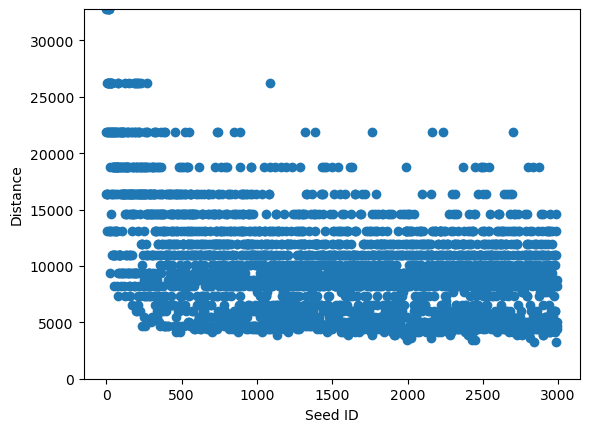 图7 - Seeds的距离分布情况
下面是一个改进版本(来自AFLGo论文10):
class AFLGoSchedule(DirectedSchedule):
    def assignEnergy(self, population: Sequence[Seed]):
        min_dist: Union[int, float] = 0xFFFF
        max_dist: Union[int, float] = 0
        for seed in population:
            if seed.distance < 0:
                num_dist = 0
                sum_dist = 0
                for f in self.__getFunctions__(seed.coverage):
                    if f in list(self.distance):
                        sum_dist += self.distance[f]
                        num_dist += 1
                seed.distance = sum_dist / num_dist
            if seed.distance < min_dist: min_dist = seed.distance
            if seed.distance > max_dist: max_dist = seed.distance
        for seed in population:
            if seed.distance == min_dist:
                if min_dist == max_dist: seed.energy = 1
                else: seed.energy = max_dist - min_dist
            else: seed.energy = (max_dist - min_dist) / (seed.distance - min_dist)
每个seed的新距离的数学表达如下: $$ d’(i,t)=\begin{cases} 1 & \text{if } d(i,t) = \text{minD} = \text{maxD}\\ \text{maxD} - \text{minD} & \text{if } d(i,t) = \text{minD} \neq \text{maxD}\\ \frac{\text{maxD} - \text{minD}}{d(i,t)-\text{minD}} & \text{otherwise} \end{cases} $$ 这次fuzzing一下子产生了593个能够解决迷宫问题的答案:
aflgo_schedule = AFLGoSchedule(distance, 3)
aflgo_fuzzer = GreyboxFuzzer([seed_input], maze_mutator, aflgo_schedule)
aflgo_fuzzer.runs(FunctionCoverageRunner(maze), trials=n)
print_stats(aflgo_fuzzer)

# First solution: Dq!D*YF(DDkR)NR'RR3UxdUL.LUURbRR.RDDDD
# Out of 3829 seeds,
# *  593 solved the maze,
# *  390 were valid but did not solve the maze, and
# * 2846 were invalid
4. 总结
这篇文章是对TFB五个篇章的实践总结。其中,令我印象深刻的是最后两个fuzzing实验——初始输入是一个空格" ",最终的mutation结果却十分复杂。这有点像ChatGPT,不同的是,目前为止的fuzzing seeds生成结果是可解释的。
最后,让我们用“无限猴子”定理11来结束这篇文章:
让一只猴子在打字机上随机按键,当按键时间达到无穷时,几乎必然能打出任何给定文字,比如莎士比亚的全套著作。